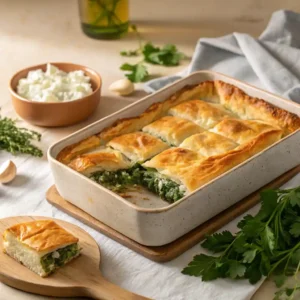
Absolutely Amazing Spanakopita Recipe
When life gets a little hectic, I find my greatest comfort in creating delicious meals that bring my family together. Today, I’m so excited to share my Spanakopita Recipe, a dish that’s both a labor of love and a weeknight wonder, taking about 1 hour and 15 minutes from start to finish. Get ready for a taste of pure joy!
Why You’ll Love This Spanakopita Recipe
- Approachable Phyllo Techniques: I’ve broken down the art of working with phyllo dough so that even beginners can achieve that signature flaky, golden crust with confidence.
- Perfectly Balanced Filling: My Spanakopita Recipe strikes a beautiful balance between earthy spinach, tangy feta, and aromatic herbs, creating a filling that’s both comforting and incredibly flavorful.
- Beautifully Crisp Crust: With a few key tips, you’ll achieve a wonderfully crisp and golden-brown phyllo crust that shatters delightfully with every bite.
- Versatile Presentation: Whether you prefer a stunning centerpiece pie or charming individual triangles, this recipe guides you to create spanakopita that looks as good as it tastes.

Absolutely Amazing Spanakopita Recipe
Ingredients
Equipment
Method
- Preheat your oven to 325 degrees F (160°C).
- First things first, let’s create that incredible filling. Before you begin mixing, it’s absolutely crucial that your thawed spinach is very well drained. Squeeze out any excess liquid by hand – I mean it, get it as dry as you possibly can!
- In a large mixing bowl, combine the thoroughly squeezed spinach with the finely chopped parsley, chopped onion, minced garlic, and 2 tablespoons of olive oil. Stir until everything is just combined. Next, add the four eggs, crumbled feta cheese, and dried dill weed. Season generously with freshly-ground black pepper. Stir gently until all the ingredients are well incorporated.
- Now, let’s build our beautiful pie. Prepare a 9 1/2″ x 13″ baking dish by brushing the bottom and sides generously with olive oil. Carefully unroll your thawed phyllo sheets. As you work, keep the unused sheets covered with a slightly damp kitchen towel to prevent them from drying out.
- Line the prepared baking dish with two sheets of phyllo dough, letting them drape over the sides. Brush these sheets lightly with olive oil. Add another two sheets in the same manner, again brushing with olive oil. Continue this process, layering two sheets at a time and brushing each layer with olive oil, until you’ve used about two-thirds of your phyllo dough.
- Evenly spread the prepared spinach and feta filling over the layered phyllo base. Now, top the filling with two more sheets of phyllo, brushing them with olive oil. Continue layering the phyllo sheets, two at a time, brushing each layer with olive oil, until all your phyllo sheets are used. Brush the very top layer generously with olive oil, and for a little extra crispness, sprinkle a few drops of water over the top.
- Carefully fold the overhanging flaps or excess phyllo from the sides down over the filling. You can even gently crumble these edges a little as you fold them. Brush these folded sides well with olive oil. Using a sharp knife, cut the spanakopita ONLY PART-WAY through into your desired serving squares, or you can leave the cutting for after baking.
- Bake in your preheated 325°F (160°C) oven for approximately 1 hour, or until the phyllo crust is beautifully crisp and a deep golden brown. Once out of the oven, finish cutting into the squares if you haven’t already, and let it cool slightly before serving. Enjoy your delicious homemade spanakopita!
- For a charming appetizer or a fun twist, let’s make individual spanakopita triangles! Follow the filling instructions above, ensuring your spinach is well-drained.
- To assemble, lay a sheet of phyllo dough flat. Brush it lightly with olive oil. Place another sheet on top and brush again. Cut this double-layered phyllo into strips about 3-4 inches wide. Take about a tablespoon of the spinach-feta filling and place it near one end of a strip. Fold the phyllo over the filling to create a triangle, continuing to fold it up the strip like a flag until you reach the end. Brush the finished triangles with olive oil. Arrange them on a baking sheet lined with parchment paper. Bake at 325°F (160°C) for about 30-40 minutes, or until golden brown and crispy.

Essential Spanakopita Ingredients
Gathering your ingredients is the first delicious step to creating this wonderful Spanakopita Recipe. I always reach for quality components to ensure the best flavor.
- For the Filling:
- 16 oz frozen chopped spinach, thawed and well-drained. It’s vital to squeeze out every last drop of moisture!
- 2 bunches flat-leaf parsley, stems trimmed, finely chopped. Fresh parsley adds a wonderful brightness.
- 1 large yellow onion, finely chopped. I like yellow onions for their mild sweetness.
- 2 garlic cloves, minced. Garlic is a flavor essential!
- 2 tbsp Private Reserve extra virgin olive oil. A good olive oil adds depth.
- 4 large eggs. These help bind the filling together beautifully.
- 10.5 oz quality feta cheese, crumbled. For the most authentic flavor and creamy texture, I highly recommend using brine-packed, sheep’s milk feta. It has a delightful tang and doesn’t get watery.
- 2 tsp dried dill weed. Dill is a star herb in traditional spanakopita, providing that unmistakable aromatic note.
- Freshly-ground black pepper. To taste, to enhance all those lovely flavors.
- For the Crust:
- 1 16 oz package The Fillo Factory Organic Dough (#4 pastry sheets), properly thawed. Following thawing instructions is key to success.
- 1 cup Private Reserve extra virgin olive oil, more if needed. A good quality olive oil is essential for brushing between the delicate phyllo layers, ensuring they bake up beautifully crisp and golden.
Step-by-Step Spanakopita Instructions: Pie & Triangles
Let’s get this Spanakopita Recipe into the oven! We’ll start with that delicious filling, then assemble our masterpiece.
Making the Spinach and Feta Filling
First things first, let’s create that incredible filling. Preheat your oven to 325 degrees F (160°C). Before you begin mixing, it’s absolutely crucial that your thawed spinach is very well drained. Squeeze out any excess liquid by hand – I mean it, get it as dry as you possibly can!
In a large mixing bowl, combine the thoroughly squeezed spinach with the finely chopped parsley, chopped onion, minced garlic, and 2 tablespoons of olive oil. Stir until everything is just combined. Next, add the four eggs, crumbled feta cheese, and dried dill weed. Season generously with freshly-ground black pepper. Stir gently until all the ingredients are well incorporated.
Assembling the Large Spanakopita Pie
Now, let’s build our beautiful pie. Prepare a 9 1/2″ x 13″ baking dish by brushing the bottom and sides generously with olive oil. Carefully unroll your thawed phyllo sheets. As you work, keep the unused sheets covered with a slightly damp kitchen towel to prevent them from drying out.
Line the prepared baking dish with two sheets of phyllo dough, letting them drape over the sides. Brush these sheets lightly with olive oil. Add another two sheets in the same manner, again brushing with olive oil. Continue this process, layering two sheets at a time and brushing each layer with olive oil, until you’ve used about two-thirds of your phyllo dough.
Evenly spread the prepared spinach and feta filling over the layered phyllo base. Now, top the filling with two more sheets of phyllo, brushing them with olive oil. Continue layering the phyllo sheets, two at a time, brushing each layer with olive oil, until all your phyllo sheets are used. Brush the very top layer generously with olive oil, and for a little extra crispness, sprinkle a few drops of water over the top.
Carefully fold the overhanging flaps or excess phyllo from the sides down over the filling. You can even gently crumble these edges a little as you fold them. Brush these folded sides well with olive oil. Using a sharp knife, cut the spanakopita ONLY PART-WAY through into your desired serving squares, or you can leave the cutting for after baking.
Bake in your preheated 325°F (160°C) oven for approximately 1 hour, or until the phyllo crust is beautifully crisp and a deep golden brown. Once out of the oven, finish cutting into the squares if you haven’t already, and let it cool slightly before serving. Enjoy your delicious homemade spanakopita!
Crafting Individual Spanakopita Triangles (Optional Variation)
For a charming appetizer or a fun twist, let’s make individual spanakopita triangles! Follow the filling instructions above, ensuring your spinach is well-drained.
To assemble, lay a sheet of phyllo dough flat. Brush it lightly with olive oil. Place another sheet on top and brush again. Cut this double-layered phyllo into strips about 3-4 inches wide. Take about a tablespoon of the spinach-feta filling and place it near one end of a strip. Fold the phyllo over the filling to create a triangle, continuing to fold it up the strip like a flag until you reach the end. Brush the finished triangles with olive oil. Arrange them on a baking sheet lined with parchment paper. Bake at 325°F (160°C) for about 30-40 minutes, or until golden brown and crispy.
Troubleshooting Common Spanakopita Issues
Even the most seasoned cooks run into a little hiccup now and then, and that’s perfectly okay! Here are some common issues with this Spanakopita Recipe and how to fix them.
| Problem | Solution |
|---|---|
| Soggy Phyllo | Ensure spinach is very well-drained. Squeeze out as much liquid as humanly possible. Also, make sure your oven temperature is accurate and you’re baking long enough for crispness. |
| Phyllo Drying Out/Crumbles | Keep unused phyllo covered with a damp towel at all times. Work efficiently. Don’t hesitate to patch tears; it’s the layers that matter most. |
| Filling Too Wet | This is a direct result of not draining the spinach enough. For extra insurance, you can place the squeezed spinach in a cheesecloth or fine-mesh sieve and press down firmly to remove any residual moisture. |
| Spanakopita Not Crispy Enough | Ensure your oven is fully preheated and at the correct temperature. Brushing generously with olive oil on all layers, especially the top, is key. Baking for the full duration until golden brown is essential. |
| Filling is Bland | Don’t be shy with the feta and herbs! Taste and adjust seasonings before baking. A good quality feta will also make a big difference. Ensure you’ve added enough dill and a pinch of nutmeg (if you choose to add it as a variation). |

Spanakopita Variations and Dietary Adaptations
Part of the joy of cooking is making a recipe your own! Here are a few ideas to adapt this Spanakopita Recipe:
- Greens: Feel free to use a mix of greens! Swiss chard or kale, finely chopped, can be used alongside or instead of spinach for a different flavor profile and texture.
- Cheese: For a creamier texture, you can incorporate some ricotta cheese along with the feta. For a dairy-free version, explore high-quality vegan feta alternatives.
- Herbs & Spices: Fresh mint can add a lovely coolness, or try adding a pinch of nutmeg to the filling for a warm, earthy note that complements the spinach beautifully.
- Additions: Some traditional recipes include a small amount of cooked ground lamb or chicken for added richness.
Equipment Checklist for Spanakopita Success
Having the right tools makes all the difference when preparing your Spanakopita Recipe. Here’s what I recommend:
- Large mixing bowl
- Sharp knife and cutting board
- Measuring spoons and cups
- Pastry brush
- 9 1/2″ x 13″ baking dish (or similar size)
- Cheesecloth or fine-mesh sieve (optional, for extra-dry spinach)
- Baking sheet (if making individual triangles)
What to Serve with Spanakopita
This versatile Spanakopita Recipe is wonderful on its own, but it also pairs beautifully with a variety of dishes.
- Appetizers: Serve warm spanakopita with a dollop of cool, creamy tzatziki sauce or alongside a simple, refreshing Greek salad. Or set out some tender-crisp fried green beans for extra crunch.
- Lunch/Light Meal: Pair a slice with a vibrant lemon-oregano dressed green salad or a comforting cup of Avgolemono soup. Or try a bowl of hearty albondigas soup for a cozy twist.
- Main Course: It makes a fantastic side dish for grilled lamb chops, chicken souvlaki skewers, or flaky baked fish.
For a light, summery dessert, finish with caramelized grilled pineapple.
Frequently Asked Questions
Let’s clear up any lingering questions about making this delicious Spanakopita Recipe.
- Can I use fresh spinach instead of frozen? Yes, you can! You’ll need about 2 lbs of fresh spinach. Wash it thoroughly, wilt it in a pan or steam it until tender, then chop and squeeze out all excess liquid, just like you would with frozen spinach.
- Can Spanakopita be made ahead of time? Absolutely! You can assemble the spanakopita and refrigerate it for up to 24 hours before baking. Just be aware you might need to add a few extra minutes to the baking time to ensure it’s heated through and crisp.
- How do I store leftover Spanakopita? Once cooled completely, store any leftover spanakopita in an airtight container in the refrigerator. It will keep well for up to 3-4 days.
- How do I reheat Spanakopita to keep it crispy? The best way to reheat is in a preheated oven (around 300°F or 150°C) for 10-15 minutes, or use your air fryer until heated through and delightfully crispy again. Please avoid the microwave, as it tends to make the phyllo soggy.
Conclusion: Enjoy Your Homemade Spanakopita!
There you have it – my heartfelt Spanakopita Recipe, made with love and designed for your busy life. I truly believe that sharing homemade food is one of the most beautiful ways to show love, and spanakopita is a perfect example of that. I hope this recipe brings warmth, comfort, and a touch of Greek sunshine to your table. Don’t be shy; I’d absolutely love to hear how yours turned out in the comments below, or tag me in your photos on social media! Happy baking!