Can you believe it’s already time for spooky season? I just love the crisp air, pumpkin spice everything, and all the fun of Halloween! If you’re anything like me, you’re probably looking for creative ways to bring that festive spirit into your home, especially with food.
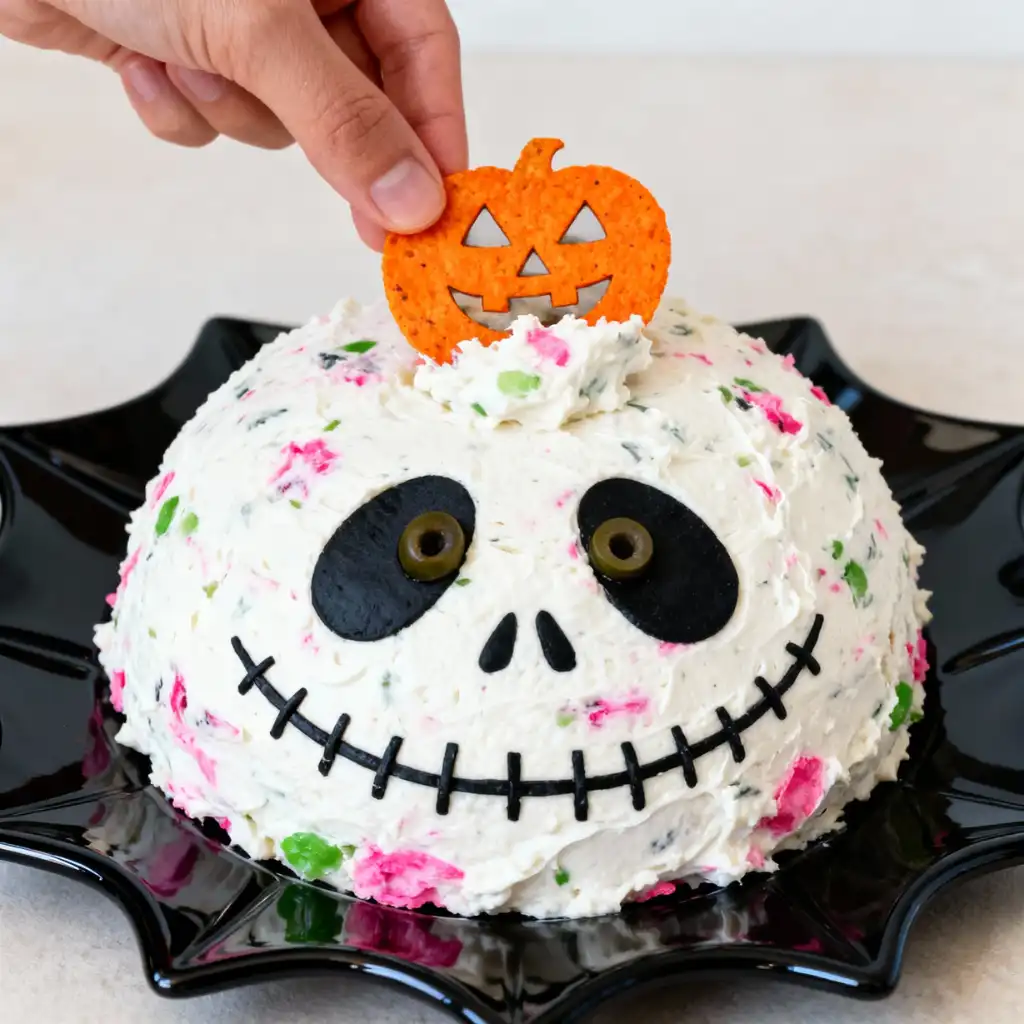
That’s why I am absolutely thrilled to share this Skellington Cheese Ball Appetizer Recipe with you today! It’s a whimsical, savory delight shaped like our favorite Pumpkin King, Jack Skellington, and it’s guaranteed to be the star of your Halloween party.
Table of Contents
What is a Skellington Cheese Ball? (And Why We Love Jack!)
Imagine a creamy, savory cheese mixture molded into a sphere, then artfully decorated to resemble the charming, iconic face of Jack Skellington from The Nightmare Before Christmas. That, my friends, is exactly what a Skellington Cheese Ball is! It’s a fantastic, spreadable appetizer that merges delicious flavors with a fun, recognizable Halloween character. Jack Skellington holds such a special place in my heart, and bringing his friendly, spooky face to life on a platter just makes me smile. It’s truly a fun and unexpected way to celebrate one of my favorite movies and seasons!
Why You’ll Love This Skellington Cheese Ball Appetizer Recipe
I know you’ll fall head over heels for this Skellington Cheese Ball Appetizer Recipe, and here’s why:
- Festive & Fun: It’s a showstopper that instantly brings a smile to everyone’s face, perfectly capturing the playful spirit of Halloween.
- Guaranteed Crowd-Pleaser: Loaded with savory flavors like smoked beef bacon and pepper jack cheese, it’s addictively delicious and always a hit.
- Make-Ahead Convenience: You can prepare the cheese ball mixture a day or two in advance, making party prep a breeze.
- Surprisingly Simple: Despite its impressive appearance, this recipe is incredibly straightforward, perfect for even beginner cooks looking for a creative project.
Amazing Skellington Cheese Ball Appetizer Recipe
Ingredients
Equipment
Method
- Start by cooking the smoked beef bacon and allow to cool. Once cooled, cut into small diced pieces and set aside. While your smoked beef bacon is cooking, allow your cream cheese to set out of the fridge for easier mixing.
- Add all ingredients into a stand mixer and mix well. You can also use a bowl and a handmixer if you have that instead.
- Place combined ingredients onto wax paper. Pick up the cheese mixture and use hands to form a ball. You want to make it as round as possible.
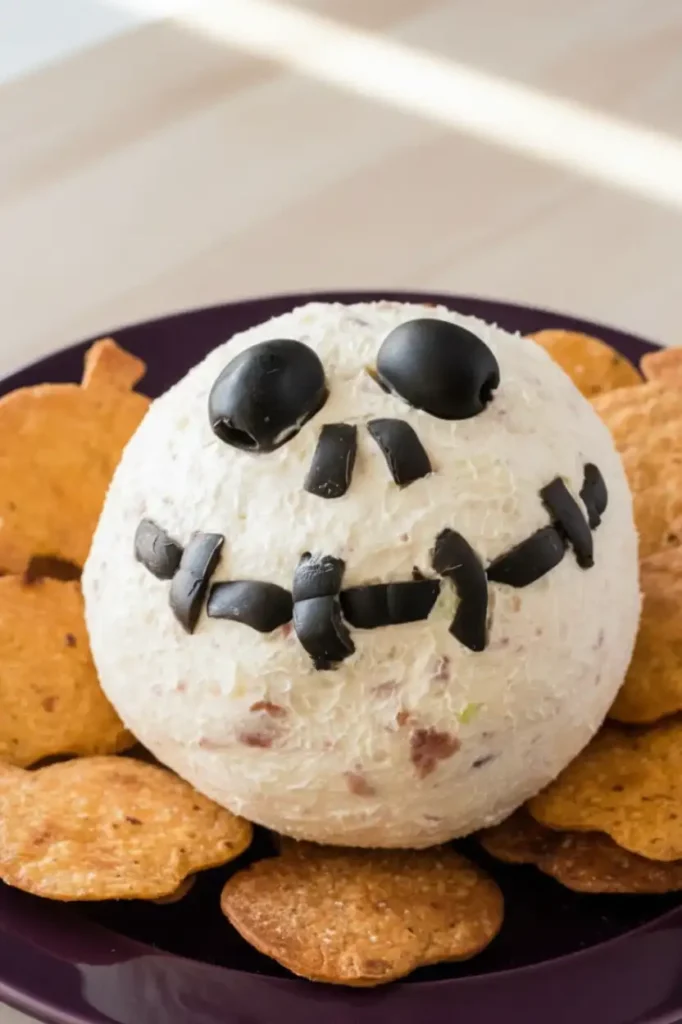
- Next, place the ball onto the wax paper and add the details of Jack’s face using the black olives. We used 2 whole olives for his eyes and then sliced olives cut in half for his mouth. You can give him that stitched look by alternating the way the cut olives are facing.
- Now, place in refrigerator for one hour to allow the cheeseball to set.
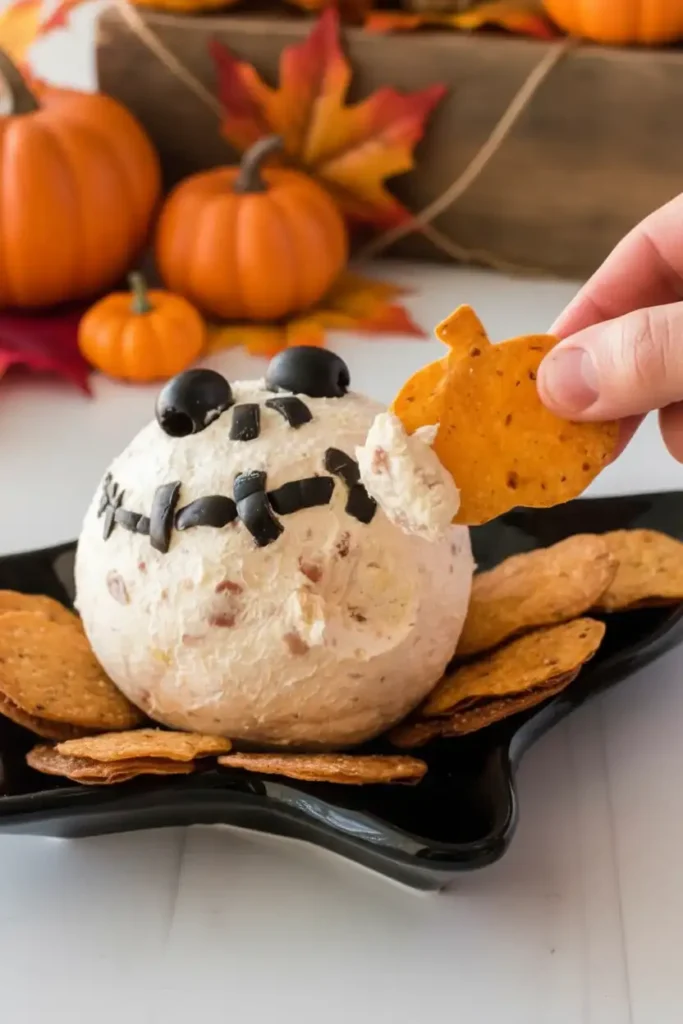
- Once set, remove from fridge and serve with our homemade pumpkin tortilla chips or crackers of your choice.
- Enjoy!
Notes
Ingredients for Your Spooky Skellington Cheese Ball
- 2 8 oz. Packages of Cream Cheese
- 1 1/2 Cups Pepper Jack Cheese
- 1/3 Cup Green Onions
- 1/2 Cup Smoked Beef Bacon Cooked and Diced
- 1/2 tablespoon Worcestershire Sauce
- Black Olives (some whole and some cut into halves)
Crafting Your Skellington Cheese Ball: Step-by-Step Instructions
- Start by cooking the smoked beef bacon and allow to cool. Once cooled, cut into small diced pieces and set aside. While your smoked beef bacon is cooking, allow your cream cheese to set out of the fridge for easier mixing.
- Add all ingredients into a stand mixer and mix well. You can also use a bowl and a handmixer if you have that instead.
- Place combined ingredients onto wax paper. Pick up the cheese mixture and use hands to form a ball. You want to make it as round as possible.
- Next, place the ball onto the wax paper and add the details of Jack’s face using the black olives. We used 2 whole olives for his eyes and then sliced olives cut in half for his mouth. You can give him that stitched look by alternating the way the cut olives are facing.
- Now, place in refrigerator for one hour to allow the cheeseball to set.
- Once set, remove from fridge and serve with our homemade pumpkin tortilla chips or crackers of your choice.
- Enjoy!
Bringing Jack to Life: A Detailed Decoration Guide
Decorating your Skellington Cheese Ball is where the magic truly happens! This is your chance to turn a delicious appetizer into a festive work of art.
For Jack’s eyes, I use two whole black olives. Simply press them gently into the top half of your cheese ball, spacing them out evenly to form his signature wide-eyed look. For his nose, I like to take a small sliver of a black olive and place it vertically, creating a thin, slightly squiggly line between his eyes. Then comes his iconic stitched mouth! Take your sliced black olives, cut in half, and arrange them in a wide, slightly curved line for his grin.
To create the stitched effect, alternate the direction of the olive halves, pressing one end down, then the other. If you need extra precision, a pair of clean tweezers can be incredibly helpful for placing those tiny olive pieces! You can also use a small paring knife to gently carve small divots for placement if you find the olives slipping. If you’re feeling adventurous, black food gel, edible food markers, or even thin strips of black bell pepper can also be used for decoration. Don’t be afraid to give him a classic grin or even a surprised expression; it’s all part of the fun!
Flavor Customization & Variations
I love how versatile a cheese ball can be! Here are some fun ways to customize your Skellington Cheese Ball:
| Ingredient/Element | Creative Variation/Substitution Idea |
|---|---|
| Cheese | Try sharp cheddar, white cheddar, mozzarella, or Colby Jack for different flavor profiles. |
| Mix-ins | Add finely chopped chives, a pinch of red pepper flakes for heat, diced jalapeños, or even a tablespoon of dried cranberries for a sweet and savory twist. Garlic powder or onion powder can also boost flavor. |
| Bacon | Experiment with turkey bacon or a spicier maple bacon for different smoky notes. |
| Outer Coating | Roll the finished cheese ball in finely crushed pecans, walnuts, or a blend of fresh herbs like parsley and chives for added texture and flavor. |
| Dietary Adaptations | For a dairy-free option, use dairy-free cream cheese and plant-based shredded cheese. Serve with veggie sticks or gluten-free crackers for lower-carb dippers. |
Sarah’s Top Tips for a Perfect Skellington Cheese Ball
I’ve made my share of cheese balls, and I’ve picked up a few tricks along the way. Here are my top tips for making your Skellington Cheese Ball truly spectacular:
- Cream Cheese Softness is Key: Make sure your cream cheese is truly at room temperature. This is so important because it ensures a super smooth, lump-free mixture that’s easy to combine and shape. If it’s too cold, you’ll end up with frustrating chunks.
- Don’t Skip the Chilling Time: That one hour in the fridge is essential! It allows all those delicious flavors to meld together beautifully and, more importantly, helps the cheese ball firm up. A firm cheese ball is much easier to shape, decorate, and serve without it collapsing or becoming too messy.
- Taste and Adjust Seasoning: Before you start shaping, always take a tiny taste of your cheese mixture! This is your opportunity to adjust the Worcestershire sauce, add a pinch of salt, or a little more pepper jack if you like. I always encourage tasting as you go.
- Achieve a Smoother Finish: For that perfectly smooth, round Jack Skellington face, I sometimes moisten my hands slightly when forming the ball. You can also press plastic wrap around the ball as you shape it, which helps create a beautifully even surface.
Troubleshooting Common Issues
Even the best cooks run into little snags sometimes! Don’t worry; I’m here to help you through any common issues you might encounter with your Skellington Cheese Ball.
- Issue: My cheese ball is too sticky to handle!
- Solution: This happens to me sometimes too! Try chilling your hands briefly in cold water or lightly oiling them with a neutral oil before shaping. You can also place the mixture on a piece of plastic wrap and use the plastic wrap to help you form the ball without direct contact.
- Issue: The cheese ball is too soft to hold its shape after chilling.
- Solution: This usually means it needs more time to firm up! Extend the chilling time by another 30 minutes to an hour. Also, ensure your cream cheese wasn’t too warm to begin with, as this can affect the final texture. Incorporating an extra quarter cup of shredded cheese can also add a bit more structure.
- Issue: The olive decorations are smudged or difficult to place.
- Solution: A firmer cheese ball is always easier to decorate. If it’s too soft, pop it back in the fridge for another 15-20 minutes. For precision, I find that tweezers are my best friend for placing those small olive pieces. You can also lightly moisten the back of the olive pieces with a tiny bit of water; sometimes this helps them adhere better.
Serving Suggestions & Themed Presentation
Once your magnificent Skellington Cheese Ball is ready, it’s time to serve it up with some delicious dippers! I always look for sturdy options that can handle a thick, creamy spread. Classic choices like wheat thins, Ritz crackers, or pretzel crisps are fantastic. For a healthier touch, colorful vegetable sticks like carrot and celery sticks, cucumber slices, or bell pepper strips are excellent. Pita chips or even bagel chips also make wonderful dippers.
For an extra spooky and fun presentation, I love placing my Skellington Cheese Ball on a black platter. You can then arrange cobweb placemats underneath, scatter some mini pumpkins around the base, or even add other Nightmare Before Christmas figurines to set the scene. Remember, the recipe suggests serving with my homemade pumpkin tortilla chips, which would be an absolutely perfect pairing if you want to make them!
Make-Ahead & Storage Instructions
This Skellington Cheese Ball is a fantastic make-ahead appetizer, which is a lifesaver for party planning!
You can prepare the cheese ball mixture up to 2-3 days in advance if you plan to decorate it closer to serving time. If you want to decorate it completely, I recommend making it no more than 1 day ahead, as the olives can sometimes weep a little. To store, simply wrap the shaped (and undecorated) cheese ball tightly in plastic wrap, pressing it firmly against the surface to prevent air exposure. Then, place it in an airtight container in the refrigerator. Leftovers should also be stored tightly wrapped in plastic wrap and kept in an airtight container in the fridge for up to 3-4 days.
Frequently Asked Questions (FAQs)
Can I use different types of cheese?
Absolutely! While I love pepper jack for its slight kick, you can swap it for sharp cheddar, white cheddar, or Colby Jack for a milder flavor. Just make sure it’s a good shreddable cheese.
How far in advance can I make this?
You can prepare the cheese ball mixture up to 2-3 days ahead. If you want to fully decorate it, I suggest doing that no more than 1 day before serving to keep the olives looking their best.
What if I don’t have a stand mixer?
No problem at all! A large mixing bowl and a sturdy hand mixer will work just as wonderfully to combine all your ingredients. Just make sure everything is well incorporated.
Can I make this dairy-free?
Yes, you certainly can! Simply use your favorite dairy-free cream cheese and a good quality plant-based shredded cheese alternative to make this recipe suitable for dairy-free diets.

