Hello friends! Sarah here, ready to share a vibrant, joyful dessert that’s fun to make and eat. We’re diving into the retro classic Jello Poke Cake—surprisingly simple with just a few ingredients. In about 4 hours (mostly chilling!), you’ll have a crowd-pleasing treat bursting with flavor and color.
Why You’ll Love This Recipe
- Effortless Elegance: This cake is a showstopper with minimal effort. It looks like you spent hours, but it comes together in a flash.
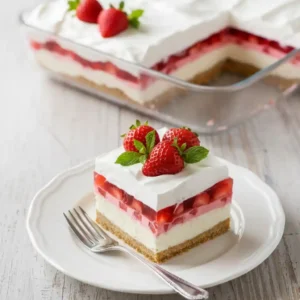
- Vibrant Visual Appeal: The way the Jello seeps through the cake creates a beautiful, colorful mosaic that’s always a delight to behold.
- Bursting with Refreshing Flavor: Each bite offers a perfect balance of moist cake and wobbly, fruity Jello.
- Endless Customization: From cake flavor to Jello color, the possibilities for personalization are truly endless.

Jello Poke Cake
Ingredients
Equipment
Method
- Prepare cake as directed on the box and bake in a 9-x-13-inch baking dish. Let cool for 15 minutes.
- Poke cake with a fork at ½-1-inch intervals.
- Use hot and cold water to make agar-agar as directed on the package.
- Spoon agar-agar liquid over the cake gradually until it is all absorbed.
- Chill in the refrigerator for 3-4 hours. Top with whipped topping right before serving.

The Secret to the Perfect Jello Poke Cake: Essential Ingredients
Gathering your ingredients is the first exciting step to making this delightful Jello Poke Cake! I always start with a classic white cake mix because I find it makes the Jello colors pop so beautifully, creating a truly stunning dessert.
- 1 (15.25-ounce) box white cake mix, (plus any ingredients listed on box) – This forms the perfect tender base for our colorful creation.
- 1 (3-ounce) box strawberry agar-agar, (or raspberry or cherry) – Choose your favorite fruit flavor! Strawberry is classic, but feel free to get creative.
- 1 cup boiling water – This helps dissolve the agar-agar completely.
- 1 cup cold water – This cools down the agar-agar mixture just enough for pouring.
- 1 (8-ounce) tub whipped topping, (or 2 cups whipped cream) – For that creamy, dreamy finish right before serving.
Step-by-Step: Crafting Your Vibrant Jello Poke Cake
Let’s get our hands a little sticky and create something truly magical! This recipe for Jello Poke Cake is one of my absolute favorites for its simplicity and impressive results. If you’re craving a fast chocolate treat, this chocolate lava cake recipe is ready in about 25 minutes.
- Prepare the Cake Base: First things first, let’s preheat your oven according to the white cake mix package directions. Mix up your cake batter just as the box says, and pour it into a 9×13 inch baking dish. I love this size because it makes for easy serving and ensures everyone gets a good piece of the action. Bake until a toothpick inserted into the center comes out clean. Once it’s out of the oven, let it cool in the pan for about 15 minutes. This short cooling period is super important – the cake needs to be warm enough for the Jello to soak in, but not so hot that it melts our beautiful Jello layer!
- Create the “Pokes”: Now for the super fun part that gives this Jello Poke Cake its name! Grab a fork – or maybe a wooden skewer or the handle end of a wooden spoon. Gently poke holes all over the surface of your slightly cooled cake. I like to aim for holes about ½ to 1 inch apart. Make sure your poking tool goes deep into the cake, but not all the way through to the bottom of the pan. This creates a lovely little network of tunnels, just perfect for our flavorful Jello to seep into.
- Mix Up the Jello Magic: While the cake is getting a little cooler, it’s time to whip up our vibrant Jello. In a heatproof bowl, carefully combine your chosen flavor of agar-agar with 1 cup of boiling water. Gently stir it for about 2 minutes until all the granules are completely dissolved. This step is key to ensuring a smooth, even set. Once it’s fully dissolved, stir in 1 cup of cold water.
- Let the Jello Soak In: Now for the moment of truth! Slowly and carefully spoon the prepared Jello liquid over the poked cake. Pour it gradually, letting it drip down into all those wonderful holes you created. Make sure to cover the entire surface of the cake. Don’t worry too much if a little bit of Jello pools on top; it will continue to soak in as it chills, making every bite wonderfully moist.
- Chill to Perfection: Once the Jello has been poured, cover the baking dish tightly with plastic wrap. This helps keep everything fresh and prevents any unwanted fridge smells from making their way in. Pop your Jello Poke Cake into the refrigerator and let it chill for at least 3 to 4 hours. This is the most important step for allowing the Jello to set properly and for all those delicious flavors to meld together beautifully. Patience truly is a virtue here, and it will reward you with the most delightful texture!
- The Grand Finale – Topping Time!: Just before you’re ready to serve this glorious Jello Poke Cake, it’s time for the final flourish. Generously spread the tub of whipped topping (or your freshly whipped cream, if you went that route) all over the chilled cake. You can create pretty swirls with the back of a spoon or keep it smooth and simple. Whatever makes your heart happy will look amazing!
Mastering the Poke: Tips for Perfect Jello Distribution
- Ideal Depth & Spacing: Aim to poke holes that are deep enough for the Jello to soak in well, about half an inch or so, but not so deep that they compromise the structural integrity of your cake. Spacing them evenly, about half an inch to an inch apart, ensures consistent Jello distribution throughout.
- Choosing Your Tool: A simple fork is my go-to; it creates lots of small holes for great absorption. However, a skewer or the rounded end of a wooden spoon can also work, creating slightly larger openings. Experiment to see what you prefer!
- Ensuring Even Absorption: Pour your Jello mixture slowly and deliberately over the entire surface of the cake. This allows it time to seep into each hole. If you notice a little Jello pooling on top, don’t fret – it will mostly soak in during the chilling process, adding to the moistness of your Jello Poke Cake.
Creative Flavor Combinations & Customization Ideas
One of the most wonderful things about a Jello Poke Cake is how easily you can customize it! It’s a fantastic canvas for all sorts of flavor adventures. For a nostalgic trio of flavors, try our Neapolitan cake triple-layer delight on your next baking day.
- Classic Pairings:
- Try a yellow cake with raspberry or cherry Jello for a slightly richer flavor.
- For a sunny, tropical vibe, pair white cake with lime or lemon Jello.
- A decadent chocolate cake with strawberry or cherry Jello offers a delightful contrast.
- Fun & Festive:
- Red, White & Blue: Use a white cake, blue raspberry Jello, and then top with fresh strawberries and blueberries for a patriotic masterpiece.
- Creamsicle Dream: Bake a white cake, use orange Jello, and top with whipped cream and a simple drizzle of chocolate sauce.
- Tropical Paradise: Combine yellow cake with lime Jello, then top with diced pineapple chunks and a sprinkle of shredded coconut.
- Boozy Twists (Optional): For an adult-only gathering, consider adding a splash of a complementary liqueur, like a raspberry liqueur with raspberry Jello, to the Jello mixture after it’s been dissolved in the hot water.

Troubleshooting Common Jello Poke Cake Hiccups
Even the simplest recipes can sometimes have a little hiccup, and that’s perfectly okay! Here are a few common Jello Poke Cake issues and how to solve them with a smile.
- Jello Not Setting/Soaking: Double-check that you used the correct amount of water (boiling and cold) and that the Jello was stirred thoroughly until completely dissolved. Also, ensure the cake had cooled sufficiently before you poured the Jello.
- Cake Too Soggy: This can happen if you accidentally use too much Jello or if it sits for an extended period before the topping is added. Stick to the specified Jello amount and chilling time. If it’s a little on the soggy side, a thicker whipped topping or frosting can often help mask it beautifully.
- Jello Leaking Out: Make sure your poking holes aren’t too large or too close to the edges of the cake. Also, ensure your cake is relatively level in the pan before you start pouring the Jello.
- Getting Clean Slices: Thorough chilling is your best friend here! For extra clean cuts, try using a sharp knife that you’ve dipped in hot water between each slice.
Advanced Topping & Serving Suggestions
Ready to take your Jello Poke Cake to the next level? While whipped topping is wonderfully classic, there are so many other delightful ways to finish off this dessert. A thin swipe of homemade strawberry jam under the whipped topping adds bright fruitiness.
- Beyond Whipped Topping: Consider a homemade stabilized whipped cream for a richer texture, or swirl in a bit of cream cheese frosting for a tangy counterpoint. A simple glaze made from powdered sugar and milk, or even a sprinkle of crushed cookies, can add a delightful crunch.
- Garnishes Galore: Fresh berries like strawberries, raspberries, or blueberries always look stunning. Maraschino cherries add a touch of retro charm. For celebrations, colorful sprinkles are a must! Toasted coconut flakes or a light dusting of powdered sugar also add an elegant touch.
- Presentation for Parties: For a casual get-together, serving directly from the 9×13 dish is perfectly charming. For a more polished look, cut individual portions and plate them. The vibrant colors of the Jello Poke Cake make it a natural showstopper, no matter how you serve it!
Storage and Make-Ahead Magic
Planning ahead is key for busy households, and this Jello Poke Cake is wonderfully accommodating. You can definitely get a head start!
- Refrigeration: Once assembled and topped, cover your Jello Poke Cake tightly with plastic wrap or an airtight lid. It’s best enjoyed within 2-3 days for optimal texture, as the cake will continue to soften slightly from the Jello.
- Make-Ahead: You can bake the cake layer a day in advance. Once completely cooled, store it uncovered at room temperature or loosely covered. Then, poke and add the Jello a few hours before you plan to serve it, and add the topping just before serving.
- Freezing (Best Practices): This Jello Poke Cake freezes best before the whipped topping is added. Once the Jello has set, cover the entire dish securely with a layer of plastic wrap, followed by a layer of aluminum foil. It can be frozen for up to 1 month. Thaw it overnight in the refrigerator before adding the whipped topping and serving. The texture might change slightly after freezing, but it will still be delightfully tasty!
Ingredient Substitutions & Dietary Notes
Making this Jello Poke Cake work for everyone is easy with a few simple swaps and considerations.
- Sugar-Free Option: Absolutely! You can use sugar-free Jello packets for a lighter version. The results are quite similar, and it’s a great way to reduce the sugar content.
- Dairy-Free Whipped Topping: Many excellent dairy-free whipped toppings are available in the freezer section of most grocery stores. They work beautifully as a substitute for traditional whipped topping or heavy cream.
- Gluten-Free Considerations: While this recipe calls for a standard white cake mix, you can easily substitute your favorite gluten-free white cake mix. Just follow its package directions for baking. The rest of the recipe remains the same!
Frequently Asked Questions
- Can I use a different cake flavor? Yes, you absolutely can! While white cake makes the Jello colors truly vibrant, yellow, funfetti, or even chocolate cake work wonderfully for different flavor profiles and appearances.
- How long does the Jello need to set? For the best texture and to ensure the Jello is fully set, I recommend chilling your Jello Poke Cake for a minimum of 3-4 hours in the refrigerator.
- Can I make this in a different pan size? You certainly can, but you might need to adjust baking times for the cake and potentially the amount of Jello needed for even coverage. A standard 9×13 inch pan is ideal for this recipe.
- Why did my Jello leak out? This is usually because the holes were too large, too close together, or the cake wasn’t quite cool enough before pouring the Jello. Careful poking and proper cooling are key!
Conclusion
And there you have it – a simple, joyful, and stunningly delicious Jello Poke Cake! I hope this recipe brings as much cheer to your kitchen as it does to mine. It’s a perfect reminder that making something beautiful and tasty doesn’t have to be complicated. I encourage you to try it, play with your favorite Jello flavors, and share your colorful creations. If you have any questions or want to share how your Jello Poke Cake turned out, please drop a comment below! Happy baking, everyone!