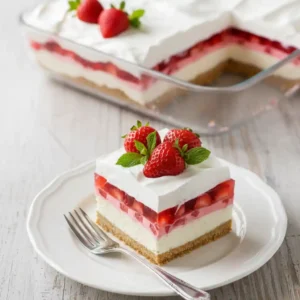
Hello friends! Sarah here—remember the magic of homemade strawberry jam on a warm scone? It tastes like sunshine! I created this delightful recipe for pure comfort and connection. Let’s capture that summer sweetness together in about 1 hour and 15 minutes.
Why You’ll Absolutely Love This Recipe
- Incredibly Flavorful: We’re using fresh, ripe strawberries at their peak, which means a burst of pure, unadulterated berry goodness in every spoonful.
- Easier Than You Think: Forget complicated steps or fancy equipment. This recipe simplifies the process, making homemade strawberry jam accessible even for beginners.
- Perfect for Gifting: Imagine the joy on someone’s face when they receive a beautiful jar of your homemade creation. It’s a heartfelt gift that always brings smiles.
- A Taste of Summer Sunshine: Even when the seasons change, this homemade strawberry jam lets you savor the vibrant, sweet taste of summer all year long.

Amazing Homemade Strawberry Jam, Remarkably Easy
Ingredients
Equipment
Method
- Prep the strawberries by washing, hulling, and roughly chopping.
- Add the chopped strawberries, sugar, and lemon juice to a large pot. Place over medium-high heat.
- Stirring frequently, bring the berries to a boil. Reduce the heat to medium-low to keep the berries at a simmer. (If it boils too hard it can overflow the pot, so reduce the heat more, if needed.)
- Let the jam simmer for about 45 minutes, frequently stirring, until the jam is thick and syrupy and reaches 220F on a candy thermometer.
- Check to see if it’s ready by adding a small drop to the frozen plate. Return it to the freezer. After a few minutes, check the consistency. Remove the jam from the heat if it’s thickened to your liking or continue simmering until desired consistency.
- When it’s done, pour the jam into a mason jar and chill overnight.
- Serve on french bread or scones.

Essential Equipment
- Large, heavy-bottomed pot
- Wooden spoon or heatproof spatula
- Measuring cups and spoons
- Candy thermometer
- Small bowls (for testing jam’s set – freeze one before starting)
- Potato masher (optional, for chunkier texture)
- Mason jars with lids
The Star Ingredients
The beauty of this homemade strawberry jam lies in its simplicity, focusing on just a few quality ingredients.
- Strawberries (about 2 pounds, washed, hulled, and roughly chopped)
- Granulated sugar (1¼ cups / 250g)
- Lemon juice (2 tablespoons / 30mL, fresh)
Step-by-Step Guide
- Prep Your Berries: Start by washing your 2 lbs of strawberries. Gently hull them (remove the green tops) and then give them a good, rough chop. Don’t worry about perfect pieces; rustic is beautiful!
- Combine and Heat: In your large, heavy-bottomed pot, combine the chopped strawberries, 1 ¼ cups of granulated sugar, and 2 tablespoons of lemon juice. Place the pot over medium-high heat.
- Bring to a Boil: Stir everything frequently as the mixture heats up. You want to bring it to a rolling boil.
- Simmer Gently: Once boiling, reduce the heat to medium-low. You want a gentle simmer, not a vigorous boil, to prevent your homemade strawberry jam from overflowing the pot. Keep an eye on it and reduce the heat further if needed.
- Thicken and Set: Let the jam simmer for about 45 minutes, stirring often to prevent sticking. Your goal is for the homemade strawberry jam to become thick and syrupy, ideally reaching 220°F (104°C) on your candy thermometer.
- Test for Readiness: (See the next section for more detail!) Grab that chilled plate from the freezer. Spoon a tiny bit of jam onto it and return it to the freezer for a couple of minutes. If it wrinkles when you gently push it with your finger, it’s ready! If not, continue simmering for a few more minutes and test again.
- Jar It Up: Once your homemade strawberry jam has reached your desired consistency, carefully remove the pot from the heat. Pour the hot jam into clean mason jars.
- Chill Overnight: Let the jars cool on the counter, then transfer them to the refrigerator to chill overnight. This allows the jam to fully set and develop its wonderful texture.
- Serve and Enjoy: The next morning, your homemade strawberry jam is ready to be slathered on toast, scones, or whatever your heart desires!
Texture Talk: Chunky vs. Smooth Homemade Strawberry Jam
The beauty of homemade strawberry jam is that you can tailor the texture to your exact liking! This recipe, with its instruction to “roughly chop” the strawberries, naturally lends itself to a delightfully chunky jam. Those little berry pieces give it wonderful character and a satisfying bite.
If you’re dreaming of a smoother, more jelly-like homemade strawberry jam, you have a couple of easy options:
- Mash During Cooking: As your jam simmers, you can use your potato masher or the back of your spoon to break down the strawberry pieces more thoroughly. Keep mashing until you reach your desired level of smoothness.
- Blend Before Simmering: For an even smoother result, you can puree a portion (or all) of your chopped strawberries in a food processor or with an immersion blender before you add them to the pot with the sugar and lemon juice. Blend until you achieve your desired consistency.
- Blend After Cooking (Carefully!): If you have an immersion blender, you can carefully blend the jam right in the pot after it has cooked and slightly cooled. Be very cautious, as hot jam can splatter. Blend in short bursts until smooth.
Choose the method that best suits your preference for a truly personalized homemade strawberry jam experience!

Storing Your Delicious Homemade A Guide
- Refrigeration: After your jam has chilled overnight and set beautifully, store it in airtight containers (like the mason jars you poured it into) in the refrigerator. Properly stored homemade strawberry jam will typically last for about 2-3 weeks. Always use clean utensils when scooping out jam to avoid introducing bacteria.
- Freezing: For longer storage, freezing is an excellent option! Let your jam cool completely after cooking, then pour it into freezer-safe containers, leaving about ½ inch of headspace at the top, as the jam will expand slightly when frozen. You can also freeze it in smaller portions like ice cube trays for easy thawing of smaller amounts. Frozen homemade strawberry jam can last for up to a year.
- Canning (Water Bath): If you want shelf-stable homemade strawberry jam that will last for months (even years!) on your pantry shelf, water bath canning is the way to go. Make sure your jars and lids are sterilized according to canning guidelines. Process filled jars in a boiling water bath for the recommended time (usually around 10 minutes for small jars, but always check reliable canning resources for the most up-to-date safety information). Proper canning is crucial for safety, as it eliminates harmful bacteria.
Simple Servings: Delicious Ways to Use Homemade Strawberry Jam
- The Classics: Spread generously on warm toast, buttery scones, fluffy muffins, or flaky croissants. It’s a breakfast and brunch staple for a reason!
- Sweet Fillings: Use it as a luscious filling for homemade cakes, thumbprint cookies, or even crepes. For more sweet inspiration, browse our desserts and treats.
- Yogurt & Oatmeal Booster: Swirl a spoonful into plain yogurt or your morning oatmeal for a burst of fruity sweetness. It’s a healthier way to sweeten!
- Ice Cream Topping: Elevate your favorite vanilla ice cream by topping it with a dollop of this vibrant homemade strawberry jam, or spoon it over a warm chocolate lava cake.
- Savory Surprises: Don’t limit yourself to sweets! A touch of homemade strawberry jam can add a wonderful sweet-tart glaze to pork chops or chicken, or be incorporated into a simple vinaigrette for a unique salad dressing. Try brushing it onto quick ginger chicken for a glossy, sweet-savory finish.
Common Mistakes to Avoid When Making Homemade Strawberry Jam
- Using a Pot That’s Too Small: Jam bubbles up significantly as it cooks. Using a pot that’s too shallow or narrow is a recipe for a messy boil-over. Always use a pot that’s at least twice the volume of your ingredients.
- Not Stirring Enough: The sugar and fruit can easily scorch on the bottom of the pot if you’re not stirring frequently, especially as the jam thickens. Be patient and stir often!
- Not Testing for Set Properly: Relying solely on cooking time can be misleading, as fruit and sugar ratios can vary. Always use the frozen plate test or a candy thermometer to ensure your homemade strawberry jam will set correctly.
- Improper Canning Procedures: If you plan to water bath can your jam for shelf stability, it’s critical to follow precise instructions regarding jar sterilization, headspace, and processing times. Skipping steps can lead to spoilage or, more seriously, unsafe food. Always consult reliable canning guides.
- Using Underripe Fruit: While you can make jam with slightly underripe berries, they contain less natural pectin. This can make it harder for the homemade strawberry jam to set without added pectin. Use the ripest, most fragrant berries you can find for the best results.
Avoiding these common pitfalls will significantly increase your chances of jam-making success!
Frequently Asked Questions
- Can I use frozen strawberries? Yes, you absolutely can! If using frozen strawberries, you may need to cook them a bit longer to evaporate the extra moisture they release as they thaw. Follow the recipe steps, but be prepared for a potentially longer simmering time.
- How long does homemade strawberry jam last? When stored in the refrigerator in an airtight container, your homemade strawberry jam should last about 2-3 weeks. If properly water bath canned, it can last on your pantry shelf for a year or more.
- Does strawberry jam have to be canned? No, it doesn’t have to be canned. If you plan to eat it within a few weeks, refrigerating it in an airtight jar is perfectly fine. For longer storage without canning, freezing is a great alternative.
- Do I need to add pectin? For this particular recipe, no, you generally don’t need to add commercial pectin. The sugar and lemon juice, along with the natural pectin in ripe strawberries, are usually sufficient for a good set.
Conclusion & Your Next Delicious Creation!
And there you have it, my friends! A beautiful jar of homemade strawberry jam, made with your own two hands. Doesn’t that just fill your heart with a little bit of joy? I truly believe that cooking should be a source of comfort and creativity, and this simple homemade strawberry jam recipe is a perfect example of that. It’s a taste of pure summer, ready to be shared or savored all on your own.