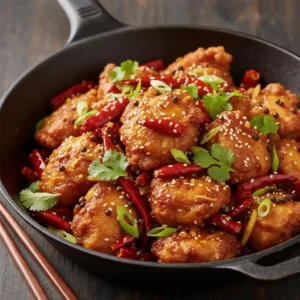
Zingy & Tender Ginger Chicken: A Weeknight Wonder!
Hello, fellow home cooks! I’m so excited to share a recipe that’s become a true weeknight hero in my kitchen. This Ginger Chicken is an absolute delight, bursting with bright, zesty flavors and boasting incredibly tender chicken. It’s proof that a delicious, satisfying meal can be on your table in under an hour, bringing smiles and comfort without the stress.
Why This Recipe is Your New Go-To
- Lightning-Fast Weeknight Fix: You can whip up this flavorful Ginger Chicken in about 45 minutes, making it perfect for those evenings when time is tight.
- Simple Ingredients, Big Flavor: We’re using everyday pantry staples and fresh ingredients to create a restaurant-worthy dish right in your own kitchen.
- A Satisfying Flavor Symphony: The balance of savory soy, tangy lime, zesty ginger, and a hint of heat is truly irresistible.
- Healthier Than Takeout: Enjoy all the deliciousness of your favorite Ginger Chicken stir-fry but with wholesome ingredients and a preparation you can trust.

Amazing Ginger Chicken: Quick, Tender, and Zesty
Ingredients
Equipment
Method
- In a bowl, whisk together the soy sauce, sugar, 1 tablespoon of lime juice, vinegar, salt, garlic, ginger, 1/4 cup of the grapeseed oil, and the sesame oil. Pour half of this mixture into a separate bowl. Add the remaining 1 tablespoon of lime juice and your minced chiles or cayenne to this second bowl. Cut each chicken breast into 2 equal pieces and place them in the bowl with the lime juice and chiles. Stir to coat and refrigerate for 15 to 30 minutes. This quick marinade infuses flavor and starts the tenderizing process for your Ginger Chicken.
- Remove the chicken from the marinade and pat it very dry with paper towels. Discard the used marinade. Lay two sheets of plastic wrap on your work surface, overlapping them slightly. Lightly brush the plastic wrap with a little olive oil (or the reserved grapeseed oil). Place a piece of chicken on the plastic wrap and brush it lightly with oil. Cover with another sheet of plastic wrap. Using the flat side of a meat tenderizer, gently pound the chicken from the center outwards until it’s about 1/4 inch thick. Be gentle so you don’t tear the meat. This pounding ensures the Ginger Chicken cooks quickly and evenly. Repeat with the remaining chicken pieces.
- Season the pounded chicken breasts with salt and pepper on one side only. Lightly dredge them in the flour, tapping off any excess. This light coating helps create a beautiful sear.
- Heat the remaining 2 tablespoons of grapeseed oil in a wide, heavy skillet over high heat. Once the oil is shimmering and hot, carefully place one or two pieces of chicken in the pan – avoid overcrowding! Cook for about 1 1/2 minutes per side, until golden brown spots appear. Don’t overcook, or your Ginger Chicken will be dry. Transfer the cooked chicken to a platter or a baking sheet. Sprinkle generously with fresh cilantro. You can keep it warm in a low oven (around 200°F or 95°C) while you prepare the salad.
- In a separate bowl, toss the arugula or salad mix with the reserved dressing from the marinating bowl.
- Distribute the dressed greens among plates or arrange them on a platter. Top with the perfectly cooked Ginger Chicken. Enjoy!

Ingredients for Perfect Ginger Chicken
Gathering your ingredients is the first joyful step to making this amazing Ginger Chicken! I’ve found that using fresh, good-quality components really makes a difference.
- 1 tablespoon soy sauce (use tamari for gluten-free!)
- 1/2 teaspoon sugar (a little sweetness balances the savory notes)
- 2 tablespoons fresh lime juice (for that essential zesty brightness)
- 1 tablespoon seasoned rice vinegar (adds a gentle tang)
- Salt to taste
- 1 garlic clove, minced or puréed (don’t skip the garlic!)
- 2 teaspoons minced fresh ginger (fresh ginger is KEY for that bright, zesty punch!)
- 1/4 cup plus 2 tablespoons grapeseed oil or sunflower oil (neutral oils work best here)
- 1 tablespoon dark sesame oil (for that unmistakable nutty aroma)
- 1 to 2 serrano or Thai green chiles, minced (to taste), or 1/8 to 1/4 teaspoon cayenne (adjust the heat to your liking!)
- 2 boneless skinless chicken breasts (about 8-10 ounces each)
- Salt and freshly ground pepper
- 2 tablespoons all-purpose flour or a gluten-free flour such as rice flour or corn flour (this helps create a lovely crust)
- 2 tablespoons chopped cilantro (for a fresh, herbaceous finish)
- 4 cups wild arugula or salad mix, rinsed and spun dry (a peppery bed for our Ginger Chicken)
Crafting the Flavorful Ginger Chicken Sauce
The magic of this Ginger Chicken truly lies in its incredible sauce. It’s a harmonious blend that hits all the right flavor notes: savory, tangy, slightly sweet, and wonderfully aromatic.
We’ll whisk together the soy sauce, sugar, half of the lime juice, and the seasoned rice vinegar. This forms the savory and slightly sweet foundation. Then, we’ll incorporate the minced garlic and fresh ginger – these are the stars, offering that signature zesty warmth and pungent kick that defines Ginger Chicken. A portion of the grapeseed or sunflower oil and the dark sesame oil are added next, bringing richness and that irresistible nutty depth. Finally, the chiles or cayenne pepper are stirred in, allowing you to customize the heat level. Remember, you can always add more spice, but you can’t take it away! We’ll reserve some of this vibrant sauce to toss with the greens later, ensuring every bite is bursting with flavor.
Step-by-Step Guide to Making Ginger Chicken
Let’s get cooking! Follow these simple steps, and you’ll have a delicious Ginger Chicken on your plate in no time. I’ve included some tips to make sure your chicken turns out perfectly tender.
- Marinate the Chicken: In a bowl, whisk together the soy sauce, sugar, 1 tablespoon of lime juice, vinegar, salt, garlic, ginger, 1/4 cup of the grapeseed oil, and the sesame oil. Pour half of this mixture into a separate bowl. Add the remaining 1 tablespoon of lime juice and your minced chiles or cayenne to this second bowl. Cut each chicken breast into 2 equal pieces and place them in the bowl with the lime juice and chiles. Stir to coat and refrigerate for 15 to 30 minutes. This quick marinade infuses flavor and starts the tenderizing process for your Ginger Chicken.
- Prepare the Chicken: Remove the chicken from the marinade and pat it very dry with paper towels. Discard the used marinade. Lay two sheets of plastic wrap on your work surface, overlapping them slightly. Lightly brush the plastic wrap with a little olive oil (or the reserved grapeseed oil). Place a piece of chicken on the plastic wrap and brush it lightly with oil. Cover with another sheet of plastic wrap. Using the flat side of a meat tenderizer, gently pound the chicken from the center outwards until it’s about 1/4 inch thick. Be gentle so you don’t tear the meat. This pounding ensures the Ginger Chicken cooks quickly and evenly. Repeat with the remaining chicken pieces.
- Season and Flour: Season the pounded chicken breasts with salt and pepper on one side only. Lightly dredge them in the flour, tapping off any excess. This light coating helps create a beautiful sear.
- Sear the Chicken: Heat the remaining 2 tablespoons of grapeseed oil in a wide, heavy skillet over high heat. Once the oil is shimmering and hot, carefully place one or two pieces of chicken in the pan – avoid overcrowding! Cook for about 1 1/2 minutes per side, until golden brown spots appear. Don’t overcook, or your Ginger Chicken will be dry. Transfer the cooked chicken to a platter or a baking sheet. Sprinkle generously with fresh cilantro. You can keep it warm in a low oven (around 200°F or 95°C) while you prepare the salad.
- Dress the Greens: In a separate bowl, toss the arugula or salad mix with the reserved dressing from the marinating bowl.
- Serve: Distribute the dressed greens among plates or arrange them on a platter. Top with the perfectly cooked Ginger Chicken. Enjoy!
Expert Tips for Ginger Chicken Success
Want to elevate your Ginger Chicken game even further? Here are a few insider tricks I’ve picked up that make all the difference:
- Dry Chicken is Key: Before searing, make sure to pat your pounded chicken breasts thoroughly dry with paper towels. This is crucial for achieving that beautiful, golden-brown crust. Wet chicken will steam, not sear!
- Hot Pan, Happy Chicken: A screaming hot skillet is your best friend for getting a great sear quickly on your Ginger Chicken. Make sure the oil is shimmering before adding the chicken.
- Don’t Crowd the Pan: Resist the urge to cook all the chicken at once. Overcrowding lowers the pan temperature, leading to less browning and potentially soggy chicken. Cook in batches if necessary.
- Pounding Power: Pounding the chicken to an even thickness ensures it cooks through quickly and remains incredibly tender. It’s a simple step that yields a huge improvement in texture for your Ginger Chicken.
Customizing Your Ginger Chicken
| Customization | Suggestions |
|---|---|
| Making it Spicier | Add more minced serrano or Thai chiles to the marinade, or a pinch more cayenne pepper. You can also add a drizzle of sriracha to the finished dish. |
| Vegetable Additions | Sautéed bell peppers, broccoli florets, snow peas, or sliced carrots can be added. Stir-fry them in the hot skillet before cooking the chicken, then set aside and toss with the greens or serve alongside. |
| Gluten-Free Options | Ensure your soy sauce is tamari or a certified gluten-free version. Use rice flour, corn flour, or a gluten-free all-purpose blend for dredging. This Ginger Chicken is naturally quite adaptable! |
| Low-Carb/Keto | Omit the sugar in the marinade or replace it with a sugar-free sweetener. For thickening, you can skip the flour dredging entirely or use a tiny bit of xanthan gum mixed into the sauce if you’re making a pan sauce. |
| Other Protein | Thinly sliced pork tenderloin, firm tofu (pressed and cubed), or peeled and deveined shrimp would also work beautifully as a substitute for chicken. Adjust cooking times accordingly for your chosen protein. |

Essential Ingredient Substitutions
| Ingredient Needed | Possible Substitutions |
|---|---|
| Soy Sauce | Tamari (for gluten-free), coconut aminos (for soy-free and lighter flavor), or Worcestershire sauce (use less). |
| Rice Vinegar | White wine vinegar, apple cider vinegar, or even lemon juice (use a bit more for tang). |
| Grapeseed/Sunflower Oil | Canola oil, avocado oil, or any other neutral cooking oil. Olive oil can work in a pinch, but avoid extra virgin. |
| Dark Sesame Oil | Toasted walnut oil or hazelnut oil for a nutty flavor, or simply omit if unavailable (though flavor will differ). |
| Serrano/Thai Chiles | Jalapeño (milder), red pepper flakes, or a dash of hot sauce. |
Serving Suggestions & Pairings
This vibrant Ginger Chicken is wonderful served over a fluffy bed of steamed jasmine rice or brown rice. For a bright, herby side, try cilantro lime rice, or when you need speed, whip up quick veggie fried rice. You could also opt for steamed or fried noodles—shrimp lo mein is a crowd-pleasing option. For a lighter meal, serve it atop a mound of quinoa or cauliflower rice. A simple cucumber salad or some steamed edamame makes for a perfect starter. To drink, a crisp lager, a dry Riesling, or even a refreshing iced green tea would complement the flavors beautifully.
Make-Ahead, Storage, and Reheating
Meal Prep: You can prepare the sauce components and mince the ginger and garlic a day ahead. Store them separately in airtight containers in the refrigerator. The chicken can also be marinated up to a few hours in advance.
Storage: Leftover Ginger Chicken and dressed greens can be stored together in an airtight container in the refrigerator for up to 2 days. The chicken will maintain its best texture if stored separately from the greens.
Reheating: Gently reheat the chicken in a skillet over medium-low heat with a splash of water or broth to prevent drying. Alternatively, microwave it carefully until just warmed through. The dressed greens are best served fresh and don’t reheat well.
Troubleshooting Common
- Dry Chicken: This usually happens from overcooking. To rescue dry chicken, chop it up and toss it with some extra sauce or broth and gently reheat. Next time, be extra vigilant about cooking time. Pounding the chicken evenly also helps prevent dryness.
- Sauce Too Thin: If the sauce for the greens seems too thin, you can gently simmer it for a few minutes to reduce it. For thicker sauces on the chicken itself, consider a cornstarch slurry (1 tsp cornstarch mixed with 2 tsp cold water, added to simmering sauce).
- Not Enough Ginger Flavor: If you want a more pronounced ginger taste in your Ginger Chicken, add an extra teaspoon or two of freshly minced ginger. You can also grate a bit of fresh ginger directly over the finished dish for an extra zing.
- Too Spicy: If your Ginger Chicken turned out spicier than you like, balance it with a bit more sweetness (sugar or honey) and a touch more acidity (lime juice or vinegar). Serving it with plain rice will also help temper the heat.
Frequently Asked Questions
Q: What’s the difference between young ginger and mature ginger? A: Young ginger is milder, more tender, and has a thinner skin, making it ideal for dishes where you want a fresh, zesty flavor without intense pungency. Mature ginger is spicier and more fibrous, better suited for slow-cooked dishes or when you need a stronger ginger kick. For this Ginger Chicken, either works, but young ginger offers a lovely brightness.
Q: Can I use chicken thighs instead of breasts for this Ginger Chicken? A: Absolutely! Boneless, skinless chicken thighs are often more forgiving and less prone to drying out. They have a bit more fat, which adds flavor. Just be sure to pound them to an even thickness and adjust the cooking time slightly, as they might take a minute or two longer to cook through.
Q: Do I really need to pound the chicken? A: Pounding the chicken to an even, thin thickness is highly recommended for this Ginger Chicken recipe. It ensures the chicken cooks quickly and evenly, resulting in a more tender and pleasant texture. It also helps it absorb the flavors beautifully.
Q: Is a wok necessary for making this Ginger Chicken? A: While a wok is fantastic for stir-frying, it’s not strictly necessary for this recipe. A wide, heavy skillet or frying pan works perfectly well for searing the chicken and serving the dish. Focus on getting the pan hot and not overcrowding it!
Conclusion
I truly hope you fall in love with this Ginger Chicken just as much as my family and I have. It’s a simple yet incredibly flavorful dish that proves you don’t need hours in the kitchen to create something truly special. This Ginger Chicken is a testament to how fresh ingredients and a little bit of love can transform a weeknight meal into a delightful experience.