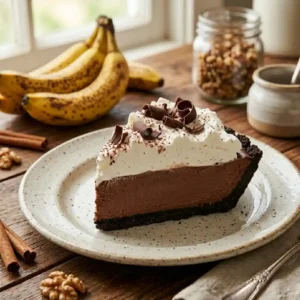
Luscious French Silk Pie: A Dreamy Chocolate Indulgence
Hello, fellow kitchen adventurers! today I’m sharing a dessert that feels like a luxurious hug: a dreamy French Silk Pie. With a rich, velvety chocolate filling and crisp crust, this showstopper looks fancy but is surprisingly manageable—taking just 30 minutes of active prep before the fridge works its magic!
Why You’ll Fall in Love with This French Silk Pie
- Unbelievably Silky Texture: This pie boasts a filling so smooth and decadent, it’s like eating pure chocolate velvet. It’s a luxurious experience that truly sets it apart.
- Deep, Rich Chocolate Flavor: We’re talking serious chocolate goodness here! The combination of high-quality baking chocolate and cocoa creates an intense, satisfying flavor that chocolate lovers will adore.
- Surprisingly Approachable: Despite its elegant appearance, this French Silk Pie recipe is designed for home cooks. You’ll be amazed at how simple it is to achieve such a sophisticated dessert.
- Guaranteed Crowd-Pleaser: Whether it’s a holiday gathering, a special occasion, or just a Tuesday that needs a little sparkle, this pie is a guaranteed hit that will have everyone asking for the recipe.

French Silk Pie
Ingredients
Equipment
Method
- Preheat your oven to 350°F (175°C). Lightly spray a 9-inch deep pie dish with cooking spray. This ensures your beautiful crust won’t stick.
- Pop those Oreo cookies into your food processor. Pulse until they’re fine crumbs – no big chunks allowed! Add the melted butter and pulse a few more times until the mixture looks like damp sand. Press this mixture firmly and evenly into the bottom and up the sides of your prepared pie dish. Pop it into the preheated oven for 10 minutes. You’ll know it’s ready when it smells wonderfully toasty and feels set. Let it cool completely on a wire rack while you move on to the star of the show – the filling!
- In a small saucepan, whisk together the granulated sugar and the eggs until they’re well combined. Place this saucepan over medium-low heat. Now, this is important: whisk constantly! We want to gently cook the eggs without scrambling them. Keep whisking until the mixture reaches 160°F (71°C) on your instant-read thermometer and thickens enough to coat the back of a metal spoon – meaning if you draw a line through it with your finger, the line holds its shape. Immediately remove it from the heat. Stir in the melted bittersweet chocolate and vanilla extract until everything is smooth and glossy. Troubleshooting Tip: If you see any bits of cooked egg forming, you might have had the heat a little too high or didn’t whisk quite enough. Don’t worry! You can strain it through a fine-mesh sieve for a smoother texture. To help it cool faster, transfer this chocolate mixture to a stainless-steel pan or bowl with a larger surface area. Let it cool to room temperature, around 75°F (24°C), stirring occasionally. This cooling step is crucial for the filling’s texture.
- In a separate, clean bowl (preferably your mixer bowl), beat the softened butter with your electric mixer until it’s wonderfully light and fluffy, about 2 to 3 minutes. Gradually add the cooled chocolate-egg mixture to the butter, beating on medium speed at first, then increasing to high speed for a full 5 minutes. You’re looking for a filling that’s airy, glossy, and has doubled in volume. This extended whipping time creates that signature lusciousness in your French Silk Pie.
- In another clean bowl, whip the cold heavy cream until it just begins to thicken. Add the 4 teaspoons of powdered sugar and continue beating until stiff peaks form. Gently fold about half of this whipped cream into the chocolate mixture. Then, carefully fold in the remaining whipped cream until just combined. Be gentle here; we want to keep that airy texture!
- Pour this glorious, fluffy chocolate filling into your cooled Oreo crust. Smooth the top evenly. It will look wonderfully tall and decadent! Cover the pie loosely with plastic wrap (try not to let it touch the filling directly) and chill in the refrigerator for at least 6 hours, or preferably overnight. This chilling time is essential for the pie to set properly and develop its signature silky texture.
- Just before serving, whip up the final topping. In a clean bowl, beat the remaining cold heavy cream with the 2 tablespoons of powdered sugar and 1 teaspoon of vanilla extract until stiff peaks form. Dollop or pipe this luscious whipped cream over your chilled French Silk Pie. For a final flourish, sprinkle with chocolate shavings or a dusting of cocoa powder.

Essential Tools for French Silk Pie Success
To help you whip up this magnificent pie, having a few key tools on hand will make the process so much smoother and ensure that wonderfully silky texture.
- Food Processor: This is your best friend for getting those Oreo cookies into fine, even crumbs for a perfectly pressed crust.
- Electric Mixer (Stand or Handheld): Essential for whipping the butter to a fluffy state and creating that airy, luscious filling.
- Instant-Read Thermometer: Crucial for safely cooking the egg and sugar mixture to the correct temperature, ensuring a silky, stable filling.
- 9-Inch Deep Pie Dish: A standard size, but opt for a deeper one to accommodate that generous, luscious filling.
- Saucepans: For melting chocolate and gently cooking the egg mixture.
- Whisk: For achieving a smooth egg and sugar base.
Ingredients for Heavenly French Silk Pie
Gathering your ingredients is the first joyful step! Here’s what you’ll need to create this masterpiece:
- For the Crust:
- 20 Oreo cookies (about 230 grams), regular stuffed ones work best! Keep that creamy filling intact for extra richness.
- 3 tablespoons unsalted butter, melted. This helps bind the crumbs together.
- For the Chocolate Filling:
- 1 1/3 cups (266 grams) granulated sugar.
- 4 large eggs. We’ll be cooking these gently to ensure safety.
- 8 ounces (227 grams) bittersweet baking chocolate, melted. Use good quality chocolate for the best flavor!
- 2 teaspoons vanilla extract. A little warmth and depth.
- 10 tablespoons (142 grams) unsalted butter, softened to room temperature. This is key for a super fluffy filling!
- For the Whipped Cream Topping:
- 1 1/3 cups heavy cream, cold. Cold cream whips up beautifully.
- 4 teaspoons powdered sugar. For just a touch of sweetness.
- 1 cup heavy cream, cold (for a second batch of topping).
- 2 tablespoons powdered sugar.
- 1 teaspoon vanilla extract.
- For Garnish (Optional):
- Chocolate shavings or cocoa powder. To make your French Silk Pie truly picture-perfect.
If that ultra-crispy bite is your love language, you’ll also enjoy this crispy chicken wings recipe for another golden, shatteringly crisp treat.
Step-by-Step Guide to Crafting the Perfect French Silk Pie
Alright, let’s get our hands deliciously dirty and create this incredible French Silk Pie!
- Prep Your Oven & Pie Dish: Preheat your oven to 350°F (175°C). Lightly spray a 9-inch deep pie dish with cooking spray. This ensures your beautiful crust won’t stick.
- Create the Oreo Crust: Pop those Oreo cookies into your food processor. Pulse until they’re fine crumbs – no big chunks allowed! Add the melted butter and pulse a few more times until the mixture looks like damp sand. Press this mixture firmly and evenly into the bottom and up the sides of your prepared pie dish. Pop it into the preheated oven for 10 minutes. You’ll know it’s ready when it smells wonderfully toasty and feels set. Let it cool completely on a wire rack while you move on to the star of the show – the filling!
- Cook the Chocolate Base: In a small saucepan, whisk together the granulated sugar and the eggs until they’re well combined. Place this saucepan over medium-low heat. Now, this is important: whisk constantly! We want to gently cook the eggs without scrambling them. Keep whisking until the mixture reaches 160°F (71°C) on your instant-read thermometer and thickens enough to coat the back of a metal spoon – meaning if you draw a line through it with your finger, the line holds its shape. Immediately remove it from the heat. Stir in the melted bittersweet chocolate and vanilla extract until everything is smooth and glossy.
- Troubleshooting Tip: If you see any bits of cooked egg forming, you might have had the heat a little too high or didn’t whisk quite enough. Don’t worry! You can strain it through a fine-mesh sieve for a smoother texture. To help it cool faster, transfer this chocolate mixture to a stainless-steel pan or bowl with a larger surface area. Let it cool to room temperature, around 75°F (24°C), stirring occasionally. This cooling step is crucial for the filling’s texture.
- Whip the Filling: In a separate, clean bowl (preferably your mixer bowl), beat the softened butter until it’s wonderfully light and fluffy, about 2 to 3 minutes. Gradually add the cooled chocolate-egg mixture to the butter, beating on medium speed at first, then increasing to high speed for a full 5 minutes. You’re looking for a filling that’s airy, glossy, and has doubled in volume. This extended whipping time creates that signature lusciousness in your French Silk Pie.
- Fold in the Cream: In another clean bowl, whip the cold heavy cream until it just begins to thicken. Add the 4 teaspoons of powdered sugar and continue beating until stiff peaks form. Gently fold about half of this whipped cream into the chocolate mixture. Then, carefully fold in the remaining whipped cream until just combined. Be gentle here; we want to keep that airy texture!
- Assemble and Chill: Pour this glorious, fluffy chocolate filling into your cooled Oreo crust. Smooth the top evenly. It will look wonderfully tall and decadent! Cover the pie loosely with plastic wrap (try not to let it touch the filling directly) and chill in the refrigerator for at least 6 hours, or preferably overnight. This chilling time is essential for the pie to set properly and develop its signature silky texture.
- Top and Garnish: Just before serving, whip up the final topping. In a clean bowl, beat the remaining cold heavy cream with the 2 tablespoons of powdered sugar and 1 teaspoon of vanilla extract until stiff peaks form. Dollop or pipe this luscious whipped cream over your chilled French Silk Pie. For a final flourish, sprinkle with chocolate shavings or a dusting of cocoa powder.
Crust Alternatives for Every Craving
While the Oreo crust is undeniably delicious and a fantastic pairing for this rich chocolate pie, sometimes you might crave something a little different. Here are a couple of popular alternatives to customize your French Silk Pie:
| Crust Type | Ingredients & Instructions |
|---|---|
| Graham Cracker | Ingredients: 1 ½ cups graham cracker crumbs, ¼ cup granulated sugar, 6 tablespoons unsalted butter (melted). Instructions: Combine crumbs and sugar. Pour in melted butter and stir until moistened. Press firmly into the bottom and up the sides of a 9-inch pie plate. Bake at 350°F (175°C) for 8-10 minutes. Cool completely. |
| Buttery Shortbread | Ingredients: 1 ½ cups finely crushed shortbread cookies, ½ cup unsalted butter (melted). Instructions: Combine crumbs and melted butter. Press firmly into the bottom and up the sides of a 9-inch pie plate. Bake at 350°F (175°C) for 10-12 minutes. Cool completely. |
Tips & Tricks for a Silky Smooth Filling
Achieving that perfect, impossibly smooth filling is the hallmark of a great French Silk Pie. Here are a few of my best tips to help you get there:
- Room Temperature Butter is Key: Make sure your butter is truly softened, not melted or too cold. This allows it to cream up beautifully and incorporate smoothly into the chocolate mixture, preventing lumps.
- Don’t Rush the Cooling: Allowing the chocolate-egg mixture to cool completely to room temperature is vital. If it’s too warm, it can melt the butter or cause the filling to be greasy.
- Whip it Good: That 5-minute whipping time for the butter and chocolate mixture isn’t just a suggestion – it’s where the magic happens! This aerates the filling, making it light and silky, not dense.
- Gentle Folding: When adding the whipped cream to the chocolate base, fold gently. Overmixing can deflate the air bubbles, resulting in a denser pie.
- Patience During Chilling: Resist the urge to cut into it too soon! That long chill time allows the filling to set to its perfect, luscious consistency.
Make Ahead & Storage Savvy
This French Silk Pie is a fantastic make-ahead dessert, which is a lifesaver for busy hosts!
- Make Ahead: You can prepare the entire pie, including the filling and crust, and let it chill for up to 2 days before serving. Add the whipped cream topping and garnish just before you plan to serve it for the freshest presentation.
- Storage: Once the pie is set, cover it loosely with plastic wrap or foil. Store it in the refrigerator for up to 3 days. Be aware that the crust might soften slightly over time.
- Freezing: While not ideal for the whipped cream topping, you can freeze the pie (without topping) for up to a month. Thaw it overnight in the refrigerator before topping and serving.
Serving Suggestions for Ultimate Enjoyment
Serving this decadent French Silk Pie is all about enhancing that rich chocolate experience.
- Perfect Pairings: A strong, freshly brewed coffee or a smooth espresso complements the deep chocolate flavor beautifully. For an adult treat, a small glass of port wine or a coffee liqueur like Kahlúa makes a sophisticated accompaniment.
- Presentation is Key: Serve each slice on a beautiful dessert plate. A drizzle of chocolate sauce or a sprinkle of cocoa powder around the plate can add an extra touch of elegance. Don’t forget that final flourish of whipped cream and chocolate curls!
- Keep it Simple: Sometimes, the pie itself is the star. A simple, clean plate and perhaps a single perfect chocolate curl are all you need.
Tips for a Picture-Perfect Slice
Getting a clean slice of a soft, creamy pie like this French Silk Pie can sometimes be tricky, but here’s my secret:
- Use a Sharp, Thin Knife: A long, thin blade works best for cutting through the creamy filling without dragging.
- Hot Water is Your Friend: Dip the knife in hot water and wipe it dry with a clean towel before each cut. This creates a slippery surface, allowing the knife to glide effortlessly through the pie.
- Gentle Pressure: Apply steady, gentle pressure rather than forcing the knife down.
- Wipe Between Cuts: Make sure to wipe the knife clean after each slice to remove any filling that might stick and drag.
Dietary Variations: Gluten-Free & Dairy-Free French Silk Pie
While this recipe is traditionally made with gluten and dairy, we can explore some modifications for those with dietary needs.
- Gluten-Free: The easiest swap is the crust! Use a pre-made gluten-free Oreo-style cookie crust or prepare a graham cracker crust using certified gluten-free graham crackers. The filling itself is naturally gluten-free.
- Dairy-Free: This is a bit trickier as dairy plays a significant role in texture.
- Crust: Use a dairy-free butter substitute or coconut oil for the crust. Many dairy-free chocolate sandwich cookies are available.
- Filling: You can try using a high-quality dairy-free butter substitute and ensure your baking chocolate is dairy-free. However, the texture might be slightly different as traditional butter contributes significantly to the silkiness.
- Topping: Use full-fat canned coconut cream (scoop the thick cream from the top of a chilled can) whipped with powdered sugar and vanilla. Note that the texture will be lighter and might not hold quite as stiffly as dairy whipped cream. Be prepared for a slightly altered, though still delicious, outcome.
Frequently Asked Questions About French Silk Pie
- Does French Silk Pie contain raw eggs? My recipe uses a gentle cooking method for the eggs and sugar mixture, heating it to 160°F (71°C). This process ensures the eggs are safely cooked, making the filling safe to consume without the concern of raw eggs.
- Why is my French Silk Pie filling grainy? A grainy texture usually happens if the butter and chocolate mixture wasn’t fully cooled before whipping, or if the butter wasn’t properly softened. Ensuring all components are at the right temperature and the mixture is whipped sufficiently helps achieve that smooth, silky finish.
- Can I make this pie without a food processor for the crust? Absolutely! You can place the Oreo cookies in a sturdy zip-top bag, seal it, and then crush them with a rolling pin or the bottom of a heavy pan until they form fine crumbs.
- My whipped cream topping is too soft. What did I do wrong? Ensure your heavy cream was very cold and that your mixing bowl and beaters were also chilled. Over-whipping can sometimes break down the cream, while under-whipping won’t create stiff peaks. Aim for peaks that hold their shape when you lift the beaters.
You Made It! Now Tell Me All About It!
Congratulations, you’ve just created a truly magnificent French Silk Pie! I hope you felt that spark of joy in your kitchen and that the process was as delightful as the first bite. This pie is a little slice of heaven, perfect for sharing those cozy moments with loved ones.
Did you try any of the flavor twists? How did your chocolate curls turn out? I can’t wait to hear all about your French Silk Pie adventures – leave a comment below and share your joyful baking story! And if any questions popped up during your culinary journey, don’t hesitate to ask. Let’s keep the delicious conversations going! You can Follow us on Pinterest.