The Most Amazing Beef Bulgogi Recipe: Quick & Flavorful!
I remember the first time I tasted authentic Beef Bulgogi. It was a revelation – that perfect balance of sweet, savory, and a hint of spice, all wrapped up in tender, melt-in-your-mouth steak. It felt so gourmet, yet surprisingly simple to bring to my own table. This recipe is my go-to for a taste of Korea that comes together faster than you might think, perfect for those busy weeknights or whenever a craving strikes!

Ultimate Beef Bulgogi: Quick, Tender & Flavorful
Ingredients
Equipment
Method
- First, let’s get that steak ready. Wrap your steak tightly in plastic wrap and pop it into the freezer for about 30 minutes. Once it’s firmed up a bit, unwrap it and carefully slice it across the grain into thin, 1/4-inch thick pieces. This freezing step makes slicing so much easier!
- In a medium bowl, whisk together the grated pear, soy sauce, brown sugar, sesame oil, minced garlic, grated ginger, and gochujang until well combined.
- Place your thinly sliced steak into a gallon-size resealable bag. Pour the prepared soy sauce mixture over the steak. Seal the bag, pressing out as much air as possible, and give it a good massage to ensure all the steak pieces are coated. Let it marinate in the refrigerator for at least 2 hours, or for even deeper flavor, marinate overnight, turning the bag occasionally to ensure even distribution.
- Now for the cooking! Heat 1 tablespoon of vegetable oil in a cast iron grill pan or heavy-bottomed skillet over medium-high heat until it’s shimmering. Working in batches to avoid overcrowding the pan, add the marinated steak in a single layer. Cook for about 2-3 minutes per side, flipping just once, until beautifully charred and cooked through.
- Remove the cooked steak to a plate. Add the remaining 1 tablespoon of vegetable oil to the pan if needed, and repeat with the remaining steak, cooking in batches.
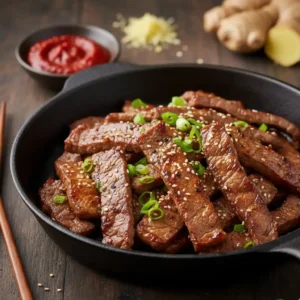
- Serve your delicious Beef Bulgogi immediately. Garnish generously with thinly sliced green onions and toasted sesame seeds, if desired. Enjoy!

How to Make Beef Bulgogi: A Simple Step-by-Step Recipe
Here’s the straightforward way to bring this amazing Beef Bulgogi into your kitchen. Get ready for some serious flavor!
Ingredients
- 1 1/2 pounds boneless rib eye steak
- 1/2 small pear (peeled and coarsely grated)
- 1/4 cup reduced sodium soy sauce
- 2 tablespoons brown sugar
- 2 tablespoons toasted sesame oil
- 3 cloves garlic (minced)
- 1 tablespoon freshly grated ginger
- 1 tablespoon gochujang (Korean red pepper paste)
- 2 tablespoons vegetable oil (divided)
- 2 green onions (thinly sliced)
- 1 teaspoon toasted sesame seeds
Instructions
- First, let’s get that steak ready. Wrap your steak tightly in plastic wrap and pop it into the freezer for about 30 minutes. Once it’s firmed up a bit, unwrap it and carefully slice it across the grain into thin, 1/4-inch thick pieces. This freezing step makes slicing so much easier!
- In a medium bowl, whisk together the grated pear, soy sauce, brown sugar, sesame oil, minced garlic, grated ginger, and gochujang until well combined.
- Place your thinly sliced steak into a gallon-size resealable bag. Pour the prepared soy sauce mixture over the steak. Seal the bag, pressing out as much air as possible, and give it a good massage to ensure all the steak pieces are coated. Let it marinate in the refrigerator for at least 2 hours, or for even deeper flavor, marinate overnight, turning the bag occasionally to ensure even distribution.
- Now for the cooking! Heat 1 tablespoon of vegetable oil in a cast iron grill pan or heavy-bottomed skillet over medium-high heat until it’s shimmering. Working in batches to avoid overcrowding the pan, add the marinated steak in a single layer. Cook for about 2-3 minutes per side, flipping just once, until beautifully charred and cooked through.
- Remove the cooked steak to a plate. Add the remaining 1 tablespoon of vegetable oil to the pan if needed, and repeat with the remaining steak, cooking in batches.
- Serve your delicious Beef Bulgogi immediately. Garnish generously with thinly sliced green onions and toasted sesame seeds, if desired. Enjoy!
What to Serve with Beef Bulgogi: A Feast of Korean Flavors
Serve this vibrant Beef Bulgogi with essential steamed white rice and a spread of traditional *banchan*. Elevate the meal with crisp kimchi (to cut the richness), seasoned spinach or bean sprouts, and pickled radishes. A crisp Korean lager, soju, or green tea completes the feast.
Delicious Beef Bulgogi Variations and Creative Uses
Once you’ve mastered the classic Beef Bulgogi, you’ll find its deliciousness translates to so many other dishes! One of my favorite ways to use it is in Bulgogi Tacos. Simply pile the cooked bulgogi onto warm corn or flour tortillas, then top with a quick slaw (shredded cabbage, carrots, a touch of lime juice, and cilantro), a drizzle of sriracha mayo, and a sprinkle of sesame seeds.
Another fantastic option is a Bulgogi Rice Bowl. Serve the cooked bulgogi over a bed of fluffy rice, then add your favorite toppings like a fried egg with a runny yolk, sautéed mushrooms, kimchi, and a drizzle of extra marinade or soy sauce. You can even toss leftover bulgogi into quick veggie fried rice or use it as a flavorful filling for sandwiches or lettuce wraps.

Troubleshooting Common Beef Bulgogi Problems
Even the best cooks face the occasional kitchen hiccup! If your Beef Bulgogi turned out a bit tough, it might be because the meat wasn’t sliced thinly enough or against the grain. Remember that freezer trick and slice thin! If it tastes too salty, you can sometimes balance it with a touch more sweetness (a tiny bit more brown sugar) or by serving it with plain rice and milder sides. Conversely, if it’s too sweet, a splash more soy sauce or a squeeze of lime can help. A watery pan during cooking usually means you crowded it; always cook in batches! For that desired char, ensure your pan is truly hot before adding the meat.
Tips for Success and Dietary Adaptations
To guarantee a winning Beef Bulgogi every time, here are a few more nuggets of wisdom. Ensure your pear is ripe for maximum tenderizing power. Taste your marinade before adding the steak and adjust seasonings to your preference – a little more sugar, a little more spice? For a healthier spin, you can easily reduce the brown sugar and opt for a low-sodium soy sauce or tamari. If you’re keeping things gluten-free, use tamari or coconut aminos instead of soy sauce, and double-check your gochujang for gluten-containing ingredients. For a vegetarian twist, thinly sliced king oyster mushrooms or firm tofu can be marinated and cooked similarly, though they won’t achieve the same texture.
How to Store and Reheat Your Delicious Beef Bulgogi
Leftover Beef Bulgogi is a treasure! Store any marinated, uncooked steak in an airtight container in the refrigerator for up to 2 days. Cooked bulgogi will keep well in an airtight container in the fridge for 3-4 days. To reheat, the best method is usually to gently stir-fry it in a skillet over medium heat with a tiny splash of water or oil, just until warmed through. This helps maintain its tender texture and prevents it from drying out. You can also reheat it in the microwave, but be sure to cover it loosely to trap moisture.
Frequently Asked Questions about Beef Bulgogi
Q: Can I use a different type of meat for Bulgogi? A: Absolutely! While ribeye and sirloin are my favorites for their tenderness and marbling, thinly sliced chicken thighs, pork shoulder, or even firm tofu can be used. Adjust cooking times as needed.
Q: How long does the marinade really need to sit? A: For optimal flavor, I recommend at least 2 hours. However, marinating overnight allows the flavors to penetrate even deeper, resulting in a truly spectacular Beef Bulgogi.
Q: What’s the best way to get that nice char on the beef? A: The key is a very hot pan (cast iron is ideal!) and cooking the meat in a single layer without overcrowding. This allows the sugars in the marinade to caramelize and brown properly, creating that coveted char.
Wrap Up Your Bulgogi Adventure!
And there you have it – a truly delightful Beef Bulgogi that’s surprisingly simple to whip up right in your own kitchen! I hope this recipe brings a little bit of that cozy, comforting Korean magic to your table. Don’t be shy, give it a try and let me know how it turns out in the comments below! I’d love to hear your tips, any delicious variations you discover, or see pictures of your culinary triumphs. Happy cooking, and thanks for joining me on this flavor adventure at The Meal Craft!