Baked Chicken Tacos: Simply Amazing Weeknight Delight!
Transform your weeknight dinner with these easy and delicious Baked Chicken Tacos! Skip the messy frying and bake your way to perfectly crisp shells and a flavorful filling in just 30-40 minutes.
Why You’ll Absolutely Adore These Easy Baked Chicken Tacos
- Effortless Cleanup: Baking means less splatter and fewer dishes than frying. Just one baking dish and a skillet make cleanup a breeze.
- Perfectly Crispy Shells: The oven works magic, giving you wonderfully crisp taco shells without any oily mess. Each bite is satisfyingly crunchy!
- Family-Friendly Fun: Everyone loves tacos! These are easy to customize with favorite toppings, making them a hit for all ages and tastes.
- Quick & Convenient: With pre-cooked chicken and smart baking steps, you can get these delicious baked chicken tacos on the table in under 40 minutes.

The Ultimate Baked Chicken Tacos Recipe
Ingredients
Equipment
Method
- Preheat oven to 400°F. Spray a 9×13-inch baking dish with nonstick spray.
- Heat the olive oil over medium heat in a medium skillet.
- Add onion to skillet and cook for 2-3 minutes, or until the onion is translucent and fragrant.
- Stir in the chicken, taco seasoning, tomatoes (fully drained), and green chiles (fully drained). Stir to combine fully. Reduce to simmer and allow to cook for 5-8 minutes.
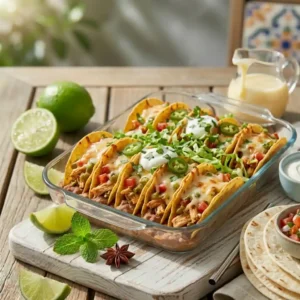
- Place the taco shells in the baking dish, standing up. We were able to fit 10 taco shells in the dish by adding 2 on each side.
- Bake the taco shells for 5 minutes by themselves to allow them to crisp up. Remove from the oven.
- Spoon 1 tablespoon of beans into the bottom of each taco shell. Top with the chicken mixture, almost to the top of each shell.
- Sprinkle each shell generously with shredded cheese, the more the better!
- Bake for 7-10 minutes, or until cheese is fully melted and the edges of the shells are browned.
- Remove from the oven and top with your favorite items such as jalapenos, sour cream, shredded lettuce, cilantro, and salsa.

Gather Your Ingredients for Amazing Baked Chicken Tacos
Let’s get ready to make some incredible Baked Chicken Tacos! Here’s what you’ll need from your pantry and fridge. Don’t worry if you need to make a swap or two; I’ve got you covered with some easy alternatives below.
Ingredients:
- 1 tablespoon olive oil
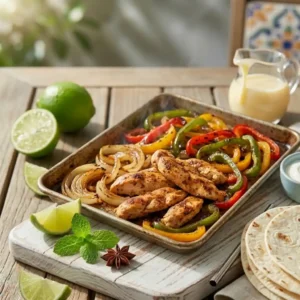
- ½ pound shredded cooked chicken (We used Rotisserie chicken)
- 1 ounce taco seasoning ((click for recipe!))
- ½ cup diced onion
- 14.5 ounces diced tomatoes (fully drained (1 can))
- 4.5 ounces diced green chiles (fully drained (1 can))
- 10 hard taco shells (We used Old El Paso Stand ‘N Stuff)
- 8 ounces refried beans ((½ can))
- 2 cups shredded Mexican blend cheese
- Sliced jalapeños
- Sour cream
- Salsa
- Shredded lettuce
- Chopped fresh cilantro
If you enjoy Italian-style veal, you might also love our crispy and tender Veal Parmesan for another dinnertime classic.
The Magic of Rotisserie Chicken (and Easy Alternatives!)
Rotisserie chicken is my weeknight hero! It’s flavorful, perfectly cooked, and saves so much time, making these baked chicken tacos a breeze. Just shred it up, and you’re good to go. If you don’t have rotisserie chicken, no problem! You can easily cook and shred your own. Simply boil, bake, or pan-fry two boneless, skinless chicken breasts or thighs until cooked through. Then, shred them using two forks or a stand mixer. For extra flavor, you can even season your fresh chicken with a pinch of salt, pepper, and some of that taco seasoning before cooking.
Choosing Your Tortillas: Hard Shells, Corn, or Flour?
For this particular recipe, we’re all about those classic hard taco shells, like the Old El Paso Stand ‘N Stuff, because they hold their shape beautifully in the oven and crisp up so well. However, you have options!
- Hard Taco Shells: Our go-to for maximum crunch and easy baking. They stand up well in the dish.
- Corn Tortillas: For a softer, chewier taco, corn tortillas are wonderful. To prevent cracking, warm them slightly in a dry skillet or microwave for a few seconds before filling. You can also brush them lightly with oil before baking for a crisper edge.
- Flour Tortillas: These offer a softer, more pliable taco. Choose a smaller size for “street taco” style, or a larger one for a burrito-like experience. They won’t get as crispy as hard shells but will warm beautifully.
Step-by-Step: How to Craft Your Baked Chicken Tacos
Ready to create some seriously delicious Baked Chicken Tacos? Follow these simple instructions, and you’ll have a fantastic meal in no time. I’ve broken it down for you so every step is clear and easy to follow.
- Preheat oven to 400°F. Spray a 9×13-inch baking dish with nonstick spray.
- Heat the olive oil over medium heat in a medium skillet.
- Add onion to skillet and cook for 2-3 minutes, or until the onion is translucent and fragrant.
- Stir in the chicken, taco seasoning, tomatoes (fully drained), and green chiles (fully drained). Stir to combine fully. Reduce to simmer and allow to cook for 5-8 minutes.
- Place the taco shells in the baking dish, standing up. We were able to fit 10 taco shells in the dish by adding 2 on each side.
- Bake the taco shells for 5 minutes by themselves to allow them to crisp up. Remove from the oven.
- Spoon 1 tablespoon of beans into the bottom of each taco shell. Top with the chicken mixture, almost to the top of each shell.
- Sprinkle each shell generously with shredded cheese, the more the better!
- Bake for 7-10 minutes, or until cheese is fully melted and the edges of the shells are browned.
- Remove from the oven and top with your favorite items such as jalapenos, sour cream, shredded lettuce, cilantro, and salsa.
Sarah’s Secret Tips for the Crispiest Baked Chicken Tacos
Want to guarantee your baked chicken tacos are absolutely perfect every time? Here are my go-to tips for achieving maximum crispiness and flavor:
- Drain Canned Ingredients Thoroughly: This is crucial! Excess liquid from diced tomatoes and green chiles can make your filling watery and lead to soggy shells. Press out as much moisture as possible before adding them to the skillet.
- Don’t Overfill: While it’s tempting to load them up, overfilling your taco shells can make them difficult to handle and can prevent even cooking. Fill them just shy of the top.
- Pre-Bake the Shells: As mentioned in the instructions, a quick 5-minute bake of the empty shells helps them firm up and get beautifully crisp before adding the filling. This prevents them from becoming soft under the moist filling.
- Line Your Baking Dish: For super easy cleanup, line your 9×13-inch baking dish with parchment paper before spraying with nonstick spray. Any cheese drips or crumbs will lift right out!
Delicious Variations & Clever Substitutions for Your Baked Chicken Tacos
One of the best things about tacos is how customizable they are! Here are some ideas to switch up your baked chicken tacos to suit any taste or dietary need.
| Category | Original Ingredient/Method | Substitution/Variation Idea |
|---|---|---|
| Protein Swaps | Shredded Cooked Chicken | Ground Beef/Turkey: Brown 1 lb ground meat, drain fat, then add taco seasoning and follow filling steps. Vegetarian: Use 1 can (15 oz) black beans or pinto beans (rinsed and drained) instead of chicken, or crumbled plant-based meat. |
| Spice Level | Mild Taco Seasoning | Spicier: Add a pinch of cayenne pepper, a dash of hot sauce to the filling, or use spicier green chiles. Milder: Reduce the taco seasoning slightly, or choose a mild variety. |
| Healthier Options | Hard Taco Shells, Mexican Cheese | Tortillas: Opt for whole wheat hard taco shells, or use soft corn or flour tortillas. Veggies: Stir in finely diced bell peppers or zucchini to the chicken mixture. Cheese: Use a reduced-fat cheese blend. |
| Dietary Needs | Standard Ingredients | Gluten-Free: Ensure your taco shells and taco seasoning are certified gluten-free. Most hard corn shells are naturally GF. Dairy-Free: Skip the cheese or use a dairy-free shredded cheese alternative. Use dairy-free sour cream or avocado crema. |
| Flavor Boosts | Diced Tomatoes, Green Chiles | Salsa Verde: Swap diced tomatoes for drained salsa verde for a tangy kick. Smoky Flavor: Add a pinch of smoked paprika or a diced chipotle in adobo to the filling. |

Elevate Your Baked Chicken Tacos: Topping & Serving Ideas
The fun doesn’t stop at baking! Transforming your perfectly baked chicken tacos into a full-on feast is all about the toppings and presentation. Think of categories for your topping bar to ensure a delightful mix of textures and flavors.
- Creamy: Sour cream, Greek yogurt, avocado slices, guacamole, or a drizzle of crema.
- Fresh & Crunchy: Shredded lettuce, chopped fresh cilantro, diced red onion, pico de gallo, or a squeeze of lime juice.
- Spicy Kicks: Sliced jalapeños (fresh or pickled), a dash of your favorite hot sauce, or a sprinkle of chili flakes.
- Salsas: Classic tomato salsa, fiery habanero salsa, or a vibrant corn and black bean salsa.
To create an unforgettable Taco Bar Experience, arrange all your topping options in small bowls. This encourages everyone to customize their tacos exactly how they like. Serve your beautiful baked chicken tacos alongside some delicious sides. I love pairing them with cilantro lime rice, a simple side of seasoned black beans, or a refreshing Mexican-style salad. A bowl of tortilla chips and a good queso dip would also be a very welcome addition!
Make-Ahead & Storage Tips for Busy Weeknights
Life gets busy, and having some make-ahead strategies for your baked chicken tacos can be a lifesaver!
You can prepare the chicken filling ahead of time. Cook the chicken and vegetable mixture completely, then let it cool. Store it in an airtight container in the refrigerator for up to 3-4 days. When you’re ready to bake, simply reheat the filling gently on the stovetop before assembling the tacos.
Storing assembled, unbaked tacos is also possible! Arrange the filled, unbaked tacos in your baking dish, cover tightly with plastic wrap and foil, and refrigerate for up to 24 hours. Bake as directed, adding a few extra minutes if baking from cold.
For longer storage, you can freeze the assembled, unbaked tacos. Fill the shells, but don’t add the cheese. Wrap each taco individually in plastic wrap, then place them in a freezer-safe bag or container. Freeze for up to 1 month. When ready to bake, unwrap, place in a baking dish, top with cheese, and bake at 400°F for 20-25 minutes, or until heated through and cheese is melted.
Reheating baked tacos is best done in the oven or an air fryer to maintain crispiness. Place leftover tacos on a baking sheet and reheat in a preheated oven at 350°F (175°C) for 10-15 minutes. In an air fryer, heat at 325°F (160°C) for 5-7 minutes. Microwaving will soften the shells, so I don’t recommend it for crispness!
Frequently Asked Questions
- Can I use corn tortillas instead of hard shells? Yes, you certainly can! To prevent corn tortillas from cracking, warm them slightly in a dry skillet or microwave before filling. You can also brush them lightly with olive oil before baking for a nice crisp.
- Can I add toppings before baking? I recommend adding fresh toppings like lettuce, sour cream, and salsa after baking. Items like jalapeños or extra cheese can be added before baking.
- How do I prevent soggy shells? The key is pre-baking the empty shells for a few minutes and ensuring all canned ingredients are thoroughly drained. Don’t overfill the shells either!
- Can I freeze assembled tacos? Yes, you can! Assemble the tacos, but do not add the cheese. Wrap each taco individually in plastic wrap, then place in a freezer-safe bag for up to one month.
Your New Favorite Weeknight Meal Awaits!
There you have it, friends! These Baked Chicken Tacos are truly a weeknight marvel. They bring together delicious flavors, incredible crispiness, and ultimate ease into one fantastic meal. I just know you’ll fall in love with how simple and satisfying they are, making dinner time less about stress and more about joy. So go ahead, gather your ingredients, and whip up a batch. I can’t wait to hear how much your family loves them! Please drop a comment below, ask any questions, or better yet, share a photo of your amazing creations. You can Follow us on Pinterest.