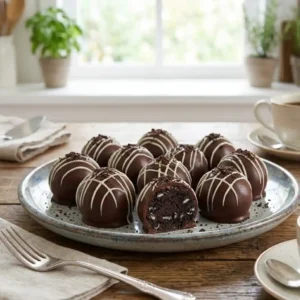
Irresistible Oreo Truffles: Pure Joy in Every Bite
Hi there, sweet friends! Today I’m thrilled to share one of my absolute favorite instant-smile treats: Oreo truffles. Combining crunchy cookies with creamy goodness and rich chocolate, these simple, joyful bites take just about an hour from start to finish—perfect for any celebration or a cozy afternoon!
Why You’ll Love This Recipe
I promise, these aren’t just any treat; they’re a little bit of magic! If you love effortless, no-bake sweets, you’ll also adore our No-Bake Chocolate Eclair Cake for another crowd-pleasing treat. Here’s why these oreo truffles will become your new go-to recipe:
- Effortlessly Simple: With just three core ingredients, you can create a dessert that tastes like it took hours. This recipe is truly a weeknight lifesaver.
- No-Bake Bliss: Forget heating up the oven; these are perfect for keeping cool in the kitchen, making them ideal for any time of year.
- Crowd-Pleasing Perfection: Everyone adores these classic oreo truffles, from kids to adults. They disappear fast at parties!
- Perfect for Gifting: Package these up beautifully, and you have a thoughtful, homemade present that shows you care. They’re ideal for holidays or just a sweet thank you.
- Customizable Fun: Easily change flavors and decorations to match any occasion or your current craving. Get creative with them!
 2")
Irresistibly Easy Oreo Truffles (No-Bake Magic)
Ingredients
Equipment
Method
- Line an 18 by 13-inch baking sheet with wax paper or parchment paper.
- Place 36 Oreos in a food processor (entire cookie, don’t remove cream filling) and pulse too fine crumbs.
- Add cream cheese and pulse in bursts until well combined.
- Scoop mixture out about 1 Tbsp at a time and form into 1-inch balls then align on prepared cookie sheet.
- Place truffles in freezer for 15 minutes. Meanwhile, crush remaining 3 Oreos.
- Melt almond bark or chocolate according to directions on package.
- Remove truffles from freezer and dip in melted chocolate and use a spoon to pour some chocolate over the top then lift and allow excess chocolate to run off.
- Return to baking sheet, immediately sprinkle tops with crushed Oreos if desired, then allow chocolate to set.
- Store in an airtight container in refrigerator.
 3")
Ingredients You’ll Need
Core Base
- Original Oreos (36 whole cookies)
- Full-fat cream cheese (softened to room temperature)
Chocolate Coating
- Vanilla or chocolate candy melts (or high-quality white, milk, or dark chocolate chips)
- Coconut oil or shortening (1 teaspoon, optional, to thin the chocolate chips if needed)
Optional Toppings & Flavor Mix-ins
- Extra crushed Oreos, sprinkles, edible glitter, or finely chopped nuts (for topping)
- Contrasting colored chocolate (for drizzling)
- Almond extract, instant coffee granules/espresso powder, or orange zest (for flavor variations)
Essential Tools
- Food processor (recommended)
- Zip-top bag and rolling pin (alternative for crushing)
- Stand mixer with paddle attachment or a sturdy spoon (alternative for mixing)
- Baking sheet
- Wax paper or parchment paper
How to Make : A Step-by-Step Guide
Let’s dive into creating these heavenly oreo truffles! Each step is designed for ease and guaranteed success. Following these tips ensures your truffles turn out perfectly smooth, creamy, and coated in rich chocolate every time.
Preparing Your Oreo Truffle Base
First, line an 18 by 13-inch baking sheet with wax paper or parchment paper to prevent sticking. Next, place 36 whole Oreos (no need to remove the cream filling!) into your food processor. Pulse them until they form very fine crumbs; this ensures a smooth, uniform truffle texture. Then, add your softened cream cheese to the food processor and pulse in short bursts. Continue pulsing until the mixture is thoroughly combined and forms a thick, uniform dough that pulls away from the sides of the bowl. This well-combined base is key for perfectly shaped oreo truffles.
The Critical Chill: Why and How Long for Oreo Truffles
Once your base is ready, scoop about 1 tablespoon of the mixture at a time and roll it into 1-inch balls. Arrange these uniformly on your prepared baking sheet. Chilling is a crucial step for the best oreo truffles. Place the rolled balls in the freezer for a minimum of 15 minutes. This firming-up period prevents the balls from falling apart when dipped into warm chocolate. Under-chilling can lead to messy dipping, while over-freezing can cause the chocolate coating to crack as the truffles thaw and expand slightly.
Mastering the Dipping Technique for Smooth Oreo Truffles
While your truffle balls are chilling, prepare your chocolate coating. Melt your candy melts or chosen chocolate according to the package directions; typically, this involves microwaving in short intervals, stirring frequently, until smooth. Once the truffle balls are firm, remove them from the freezer. Dip each ball into the melted chocolate, using a fork or a toothpick to help submerge and lift it. Gently tap off any excess chocolate, allowing it to drip back into the bowl for a clean, even coat. Work quickly to ensure the chocolate maintains an optimal dipping temperature, preventing it from becoming too thick or hardening too fast.
Adding the Finishing Touches & Decorations to Your Oreo Truffles
Immediately after dipping each truffle, return it to the prepared baking sheet. This is the perfect moment to add any desired toppings before the chocolate sets. Sprinkle the tops with finely crushed Oreos for that classic look, or get creative with sprinkles, edible glitter, or finely chopped nuts. For a festive touch, drizzle contrasting colored chocolate over the set truffles. Allow the chocolate to fully set at room temperature or in the refrigerator. This step is where your delicious oreo truffles truly become a work of art.
Creative Oreo Truffles: Variations & Flavor Twists
Get creative with your oreo truffles by trying different flavors and coatings! You can swap original Oreos for Golden Oreos or seasonal varieties like Peppermint Oreos for a festive spin. Adding a touch of almond extract or instant coffee granules to the truffle base introduces sophisticated flavors. Craving something fruity and warm? Pair your platter with our easy rhubarb crisp recipe for a dessert table that has a little of everything.
Advanced Flavor Variations for Your Oreo Truffles
Beyond peppermint, consider adding a teaspoon of espresso powder to the base for a coffee-chocolate truffle. A touch of orange zest can brighten the flavor of classic chocolate cookie truffles beautifully.
Alternative Coatings for Your Oreo Truffles
Explore new coating ideas to elevate your oreo truffles beyond classic chocolate.
| Coating Type | Flavor Profile | Tips for Application |
|---|---|---|
| White Chocolate | Sweet, creamy | Can be tinted with food coloring for themed events. |
| Peanut Butter Coating | Nutty, rich | Use a high-quality, smooth peanut butter for best results. |
| Caramel Drizzle | Sweet, buttery | Apply after the chocolate coating has fully set. |
Holiday & Themed Oreo Truffle Decorations
Decorate your oreo truffles for any occasion! Use red and green sprinkles for Christmas, pastel colors for Easter, or spooky candy eyes and orange drizzle for Halloween.
 4")
Troubleshooting Common Oreo Truffle Problems
Don’t worry if you hit a snag; these tips will help you perfect your oreo truffles every time!
- Chocolate is hardening before I’m finished: Reheat your chocolate in short bursts (15-30 seconds) in the microwave, stirring well until it’s smooth again. A double boiler can also help maintain a consistent temperature.
- Chocolate is too thick: Stir in 1-2 teaspoons of coconut oil or shortening to thin out the melted chocolate. This creates a smoother consistency for easier dipping of your chocolate Oreo balls.
- Oreo balls are falling apart: Ensure your cream cheese was fully softened and mixed thoroughly into the Oreo crumbs. If still too crumbly, add another teaspoon of softened cream cheese, mixing well until a cohesive dough forms.
- Uncoated candies are losing their shape: Pop them back into the freezer for 5-10 minutes. This quick chill will firm them up again, making them easier to handle and coat.
- Chocolate coating is cracking: This often happens if the truffles are too cold when dipped or if the chocolate is too thick. Let chilled truffles sit at room temperature for a few minutes before dipping, and thin your chocolate slightly if needed.
Gift-Giving & Presentation Ideas for Your Oreo Truffles
These delightful oreo truffles make wonderful homemade gifts! Arrange them in decorative mini cupcake liners inside a small bakery box or a clear cellophane bag tied with a festive ribbon. Stack them neatly in a mason jar for a charming presentation. These thoughtful treats are always appreciated.
Storing & Freezing Your Oreo Truffles
Keep your delicious oreo truffles fresh and ready to enjoy! Proper storage ensures they maintain their perfect texture and flavor.
How to Store Your Oreo Truffles
Store your finished oreo truffles in an airtight container in the refrigerator. They will stay fresh and delicious for up to 2 weeks. Be sure to layer them with parchment paper to prevent sticking.
Can You Freeze Oreo Truffles?
Absolutely! Oreo truffles freeze beautifully. Place them in a single layer on a baking sheet to freeze solid, then transfer them to an airtight freezer-safe container or bag. They’ll keep for up to 2 months. Thaw in the refrigerator before serving.
Dietary Considerations & Cost-Saving Tips for Oreo Truffles
Making these irresistible oreo truffles accessible and budget-friendly is important.
Making Oreo Truffles Accessible (Briefly)
You can find gluten-free Oreos and dairy-free cream cheese alternatives to make these treats suitable for more dietary needs.
Smart Saving: Making Oreo Truffles on a Budget
Look for store-brand cream cheese or chocolate melts, and purchase Oreos when they are on sale to save on ingredients.
Nutrition
Nutrition information is an estimate based on ingredients and standard preparation. It may vary based on specific brands and portion sizes.
| Nutrition Facts (per serving) |
|---|
| Calories: ~150 |
| Total Fat: ~9g |
| Saturated Fat: ~5g |
| Cholesterol: ~10mg |
| Sodium: ~70mg |
| Total Carbs: ~18g |
| Sugars: ~14g |
| Protein: ~1g |
Frequently Asked Questions
Q: Can I use a different type of cookie? A: Yes, absolutely! While oreo truffles are a classic, you can experiment with other sandwich cookies like Golden Oreos or even Nutter Butters for different flavor profiles. Adjust the cream cheese slightly if needed.
Q: My chocolate coating is too thick for dipping, what should I do? A: If your chocolate is too thick, try adding a small amount (1-2 teaspoons) of coconut oil or vegetable shortening. Stir it in thoroughly until the chocolate reaches a smoother, more liquid consistency.
Q: How long do these truffles last? A: When stored properly in an airtight container in the refrigerator, these delicious no-bake Oreo treats will stay fresh for up to two weeks. They are a great make-ahead dessert.
Q: Can I make these without a food processor? A: Yes, you can! Place the Oreos in a sturdy zip-top bag and crush them finely with a rolling pin. Then, mix the crushed cookies with softened cream cheese in a bowl using a strong spoon or a hand mixer.
Conclusion
And there you have it, friends! These delightful oreo truffles are such a joy to make and even more fun to share. I truly hope this recipe brings a little extra sweetness and comfort into your home. They’re a testament to how simple ingredients can create something truly spectacular. I’d love to hear about your creations! Drop a comment below with your favorite flavor combinations, ask any questions you have, or share a photo of your beautiful truffles with The Meal Craft community. Happy cooking!