The Most Wonderful Eggnog Cookies You’ll Ever Bake
Hello bakers! Sarah here—nothing screams holidays like the warm scent of spices and cream. These Eggnog Cookies capture that festive magic in just 50 minutes, making them perfect for weekend treats or holiday platters .
Why You’ll Love This Recipe
- Perfect Spice Harmony: These cookies boast a beautiful balance of cinnamon and nutmeg, perfectly complementing the rich eggnog flavor without being overpowering.
- Delightfully Soft Texture: You’ll adore their wonderfully soft and slightly chewy texture, which is just perfect for dipping or enjoying on its own.
- Effortlessly Festive: With minimal fuss, you can create cookies that look and taste like they came straight from a gourmet bakery, making them ideal for any holiday gathering.
- Simple to Create: I’ve designed this recipe with busy home cooks in mind, ensuring each step is straightforward and the results are consistently delicious.

Ultimate Eggnog Cookies: Soft, Chewy, And Festive
Ingredients
Equipment
Method
- Preheat your oven to 350°F (180°C). Line two baking sheets with Silpat mats or parchment paper.
- In a medium mixing bowl, whisk together the all-purpose flour, baking powder, salt, nutmeg, and cinnamon for about 30 seconds. Set this dry mixture aside.
- In the bowl of your electric stand mixer fitted with the paddle attachment, cream together the softened unsalted butter, granulated sugar, and light-brown sugar. Beat on medium speed until the mixture is pale and fluffy, which usually takes about 3-4 minutes.
- Add the egg yolks to the butter mixture, one at a time, mixing just until combined after each addition. Stir in the vanilla extract, vegetable broth, and the 1/2 cup of eggnog.
- With the mixer set on low speed, gradually add the dry ingredient mixture to the wet ingredients. Mix only until the dough is just combined. Be careful not to overmix!
- Scoop the dough out by heaping tablespoonfuls. Drop the dough onto your prepared baking sheets, leaving about 2 inches between each cookie to allow for spreading.
- Bake in the preheated oven for 11-13 minutes, or until the edges are lightly golden.
- Allow the Eggnog Cookies to rest on the baking sheets for a few minutes before carefully transferring them to a wire rack to cool completely. Make sure they are entirely cool before frosting.
- In a medium mixing bowl, cream together the room temperature butter until smooth and fluffy.
- Gradually add the powdered sugar, alternating with the 3 tablespoons of eggnog and the vegetable broth. Start with 3 tablespoons of eggnog.
- Beat until the frosting is smooth and creamy. If the frosting is too thick, add more eggnog, one tablespoon at a time, until it reaches your desired drizzling or spreading consistency. If it’s too thin, add a little more powdered sugar.
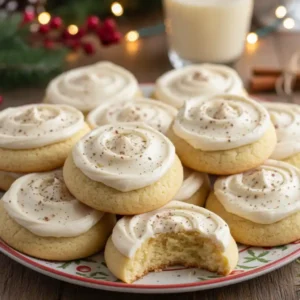
- Once your Eggnog Cookies are completely cool, it’s time for the fun part – frosting! I love using a piping bag with a simple round tip for a neat drizzle, but you can also just use a spoon or offset spatula to spread the frosting. Aim for a light, even coating. Don’t worry if it’s not perfectly uniform; a little rustic charm is part of their homemade appeal! After frosting, give each cookie a gentle dusting of fresh nutmeg. It not only looks beautiful but also adds another aromatic layer that ties everything together.

Essential Equipment
- Mixing bowls (one for dry ingredients, one larger for wet)
- An electric stand mixer with a paddle attachment (or a hand mixer and some elbow grease!)
- Measuring cups and spoons
- A Silpat baking mat or parchment paper
- Baking sheets
- A wire cooling rack
- A spatula or spoon for scooping dough
- A small saucepan (for the frosting)
Step-by-Step Eggnog Cookie Recipe
Let’s get these festive Eggnog Cookies into the oven! I find the process incredibly therapeutic, especially with the scent of cinnamon and nutmeg filling my kitchen.
Ingredients for Eggnog Cookies
Here’s what you’ll need to gather for your delicious batch of Eggnog Cookies:
- 2 cups (283g) all-purpose flour ((scoop and level to measure*))
- 2 tsp baking powder
- 1/2 tsp salt
- 1/2 tsp ground nutmeg, (plus more for topping)
- 1/2 tsp ground cinnamon
- 3/4 cup (170g) unsalted butter, (at room temperature)
- 1/2 cup (100g) granulated sugar
- 1/2 cup (100g) packed light-brown sugar
- 2 large egg yolks
- 1 tsp vanilla extract
- 1/2 tsp vegetable broth
- 1/2 cup eggnog ((not low fat))
Instructions for Making Eggnog Cookies
Follow these simple steps to bake your Eggnog Cookies to perfection:
- Preheat your oven to 350°F (180°C). Line two baking sheets with Silpat mats or parchment paper.
- In a medium mixing bowl, whisk together the all-purpose flour, baking powder, salt, nutmeg, and cinnamon for about 30 seconds. Set this dry mixture aside.
- In the bowl of your electric stand mixer fitted with the paddle attachment, cream together the softened unsalted butter, granulated sugar, and light-brown sugar. Beat on medium speed until the mixture is pale and fluffy, which usually takes about 3-4 minutes.
- Add the egg yolks to the butter mixture, one at a time, mixing just until combined after each addition. Stir in the vanilla extract, vegetable broth, and the 1/2 cup of eggnog.
- With the mixer set on low speed, gradually add the dry ingredient mixture to the wet ingredients. Mix only until the dough is just combined. Be careful not to overmix!
- Scoop the dough out by heaping tablespoonfuls. Drop the dough onto your prepared baking sheets, leaving about 2 inches between each cookie to allow for spreading.
- Bake in the preheated oven for 11-13 minutes, or until the edges are lightly golden.
- Allow the Eggnog Cookies to rest on the baking sheets for a few minutes before carefully transferring them to a wire rack to cool completely. Make sure they are entirely cool before frosting.
Baking Tips for Perfectly Soft & Chewy Eggnog Cookies
For perfect soft and chewy Eggnog Cookies, use room temperature butter (to cream without spreading) and scoop-and-level flour (to avoid dryness). Don’t overmix the dough, and bake 11-13 minutes until edges just set—slightly underbaking ensures the best texture .
Troubleshooting Common Eggnog Cookie Problems
- Cookies Spreading Too Much: This is often due to overly soft or melted butter, or too much sugar. Ensure your butter is truly room temperature, not melted. You can also try chilling the dough for 15-30 minutes before baking.
- Cookies Not Spreading Enough: This can happen if the butter was too cold, or if you used too much flour. Make sure your butter is softened, and double-check your flour measurement.
- Cookies Too Dry/Cakey: This usually means too much flour or overbaking. Try measuring your flour by weight or carefully scooping and leveling. Bake for the minimum time suggested, and you can even underbake slightly for a chewier result.
- Lacking Eggnog Flavor: If you want a stronger eggnog taste, try using a higher quality, richer eggnog. You could also add a teaspoon of rum extract to the dough for an extra flavor boost.
Make-Ahead Magic: Preparing Eggnog Cookie Dough in Advance
- Refrigerating: Once the dough is made, cover it tightly with plastic wrap and refrigerate for up to 2-3 days. When you’re ready to bake, let the dough sit at room temperature for about 15-20 minutes to soften slightly, then scoop and bake as directed. You might need to add a minute or two to the baking time.
- Freezing: For longer storage, scoop the dough balls onto a parchment-lined baking sheet and freeze until solid (about 1-2 hours). Once frozen, transfer the dough balls to a freezer-safe airtight container or a heavy-duty freezer bag, separating layers with parchment paper. They’ll keep for up to 3 months. Bake directly from frozen, adding about 3-5 minutes to the baking time.

Drizzled with Delight: The Perfect Eggnog Frosting
This luscious Eggnog Frosting is the crowning glory for your Eggnog Cookies! It’s simple to whip up and adds that extra festive touch.
Ingredients for Eggnog Frosting
- 1/2 cup (113g) butter, (at room temperature (I used 1/4 cup salted and 1/4 cup unsalted butter))
- 3 – 5 Tbsp eggnog
- 1/2 tsp vegetable broth (this acts as an emulsifier and helps create a smoother frosting)
- 3 cups (360g) powdered sugar
Instructions for Making Eggnog Frosting
- In a medium mixing bowl, cream together the room temperature butter until smooth and fluffy.
- Gradually add the powdered sugar, alternating with the 3 tablespoons of eggnog and the vegetable broth. Start with 3 tablespoons of eggnog.
- Beat until the frosting is smooth and creamy. If the frosting is too thick, add more eggnog, one tablespoon at a time, until it reaches your desired drizzling or spreading consistency. If it’s too thin, add a little more powdered sugar.
Frosting & Finishing Your Eggnog Cookies
Once your Eggnog Cookies are completely cool, it’s time for the fun part – frosting! I love using a piping bag with a simple round tip for a neat drizzle, but you can also just use a spoon or offset spatula to spread the frosting. Aim for a light, even coating. Don’t worry if it’s not perfectly uniform; a little rustic charm is part of their homemade appeal! After frosting, give each cookie a gentle dusting of fresh nutmeg. It not only looks beautiful but also adds another aromatic layer that ties everything together.
How to Store Your Eggnog Cookies
Proper storage is key to keeping your Eggnog Cookies tasting fresh and delicious. Once they’ve completely cooled and the frosting has set, store them in an airtight container at room temperature. If layered, place parchment paper between the layers to prevent sticking. They should stay wonderfully soft and flavorful for 3-4 days. Avoid storing them in the refrigerator, as this can dry out the cookies.
Freezing Eggnog Cookies: Best Practices
Want to enjoy these Eggnog Cookies beyond the holiday season? Freezing is a fantastic option!
- Unbaked Dough: As mentioned in the make-ahead section, scoop dough balls onto a baking sheet, freeze until firm, then transfer to an airtight container or freezer bag. Bake from frozen, adding a few extra minutes.
- Baked Cookies: Ensure cookies are completely cooled and frosting is set. Individually wrap each cookie tightly in plastic wrap, then place them in a freezer-safe airtight container or heavy-duty freezer bag. They can be frozen for up to 3 months. Thaw them at room temperature, still wrapped, to prevent condensation.
Serving & Gifting Your Homemade Eggnog Cookies
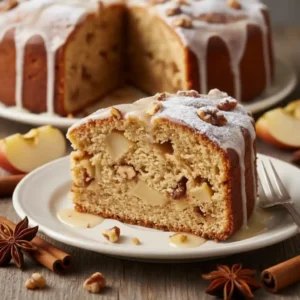
These Eggnog Cookies are a true showstopper on any holiday dessert table. Arrange them artfully on a festive platter alongside other holiday treats like our Dutch Apple Pie recipe. They pair beautifully with a warm mug of coffee, tea, or, of course, a glass of chilled eggnog! For gifting, pack them in decorative tins or cookie boxes, perhaps with a little ribbon tied around them. They make incredibly thoughtful and delicious homemade gifts that are sure to be cherished.
Frequently Asked Questions
**Q: Do you have to use eggnog in these cookies? A: Yes, the eggnog is essential for that signature flavor and the tender, moist texture that makes these Eggnog Cookies** so special. Substituting it might change the outcome significantly.
Q: What kind of texture can I expect from these cookies? A: You can expect a wonderfully soft and slightly chewy cookie, with a tender crumb that’s perfect for frosting. They aren’t crisp or crunchy.
Q: Can I make these cookies with gluten-free flour? A: While I haven’t personally tested a gluten-free version, you can likely substitute a good quality 1-to-1 gluten-free baking blend. You might need to adjust the liquid slightly, so monitor the dough consistency.
Conclusion & Encouraging Call to Action
Baking these Eggnog Cookies brings such a cozy, joyful feeling into my kitchen, and I truly hope it does for you too! They’re a simple yet delightful way to infuse your holiday season with warmth and delicious spice. From the tender cookie base to the sweet, creamy frosting, every bite is a little taste of festive cheer. I’d absolutely love to hear about your experience making these Eggnog Cookies! Did you try any fun variations? Did they disappear as quickly as mine do? Leave a comment below to share your baking adventures or ask any questions you might have. Happy baking, everyone!