A Glorious Sesame Chicken Recipe for Weeknight Wins
This sesame chicken takes me right back to a chilly autumn evening, savory aromas filling the kitchen and my family gathered, smiling. For me, that cozy, content feeling is exactly what this recipe is about—and the best part is, it comes together in about 30 minutes, making a comforting homemade meal totally doable even on the busiest weeknights.
Why You’ll Love This Sesame Chicken Recipe
This sesame chicken recipe is more than just a meal; it’s a little bit of weeknight magic I’m so excited to share with you!
- Incredibly Easy Weeknight Meal: Seriously, from start to finish, you’ll be enjoying this tasty dish in under an hour, making it perfect for those “what’s for dinner?” moments.
- Perfect Balance of Sweet and Savory: The sauce hits all the right notes – a delightful blend of salty soy, sweet brown sugar, and tangy rice vinegar that coats every piece of chicken beautifully.
- Crispy Chicken Without the Fuss: Forget deep-frying! We achieve that irresistible crispy coating right in your skillet with a simple egg and cornstarch mix.
- Customizable Deliciousness: This recipe is a fantastic base. Feel free to tweak the sweetness, tanginess, or spice to make it exactly how your family loves it.

The Ultimate Sesame Chicken Recipe
Ingredients
Equipment
Method
- First, prepare the sauce. In a small bowl stir together the soy sauce, water, sesame oil, brown sugar, rice vinegar, fresh ginger, minced garlic, cornstarch, and sesame seeds. Give it a good stir until the brown sugar dissolves and the cornstarch is fully incorporated. Set this bowl of deliciousness aside.
- Now, let’s get our chicken ready for its crispy transformation! In a large bowl, whisk together the egg with the remaining 2 tablespoons of cornstarch, plus a pinch of salt and pepper. Trim any excess fat from your chicken thighs, and then cut them into bite-sized, 1-inch pieces. Toss these chicken pieces into the egg and cornstarch mixture, giving them a good coating. Think of it as a cozy bath for the chicken, getting it ready for its golden-brown adventure!
- Heat about 2 tablespoons of cooking oil in a large skillet over medium-high heat. You want the skillet to be nice and hot – swirl it around to ensure the oil coats the entire surface. Carefully add the coated chicken pieces, spreading them out in a single layer. Resist the urge to stir them right away! Let them cook undisturbed for a few minutes until the bottoms are beautifully golden brown. Then, carefully flip the chicken pieces, gently breaking them up into smaller clumps as you go. Continue cooking until the chicken is golden brown on all sides. The goal here is to get that lovely crispiness without too much fuss.
- Once your chicken is perfectly cooked through and golden on all sides, it’s time for the sauce! Pour that prepared sauce right over the chicken in the skillet. Toss everything gently to coat each piece. As the sauce heats up and begins to simmer, you’ll notice it start to thicken beautifully. Keep gently stirring the chicken and sauce mixture until the sauce has reached a lovely glossy, thickened consistency. Then, turn off the heat. This little transformation is so satisfying!
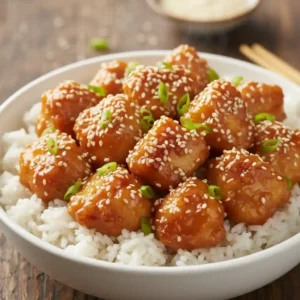
- And there you have it – your gorgeous sesame chicken recipe is ready! Serve this delicious chicken generously over a bed of fluffy cooked jasmine rice. Finally, sprinkle the sliced green onions over the top for a fresh finish. It’s a simple yet incredibly satisfying meal that’s perfect for any night of the week.
Notes

The Secret to Perfect Sesame Chicken: Understanding the Components
Every great dish starts with understanding what makes its key components tick. For our delightful sesame chicken recipe, it’s all about the simple magic of a few well-chosen ingredients and a bit of cooking know-how.
Ingredients Breakdown
Let’s chat about what goes into this flavor-packed meal and why each piece is so important.
- For the Sauce:
- ¼ cup soy sauce: The salty, umami backbone of our sauce.
- 2 Tbsp water: Helps thin the sauce to the perfect drizzling consistency.
- 1 Tbsp toasted sesame oil: This brings that signature nutty, aromatic flavor we all love!
- 3 Tbsp brown sugar: Just a touch of sweetness to make that sauce truly irresistible and help it caramelize beautifully.
- 1 Tbsp rice vinegar: Adds a bright, tangy counterpoint to the sweetness and saltiness.
- 1 tsp grated fresh ginger: A warm, zesty kick that elevates everything. Grate it fresh for the best flavor!
- 2 cloves garlic, minced: Hello, aromatic magic! Garlic is essential for that deep, savory flavor.
- ½ Tbsp cornstarch: Our secret weapon for thickening the sauce into a glossy glaze.
- 1 Tbsp sesame seeds: For a lovely little crunch and visual appeal.
- For the Chicken:
- 2 Tbsp cooking oil: We need a good oil that can handle medium-high heat for that perfect sear.
- 1 lb boneless skinless chicken thighs: The star of our show!
- 1 large egg: Acts as the binder for our crispy coating.
- 2 Tbsp cornstarch: This is key for creating that wonderfully crisp exterior on our chicken.
- 1 pinch each salt and pepper: A little seasoning to bring out the chicken’s natural flavor.
- For Serving:
- 4 cups cooked jasmine rice: The perfect fluffy canvas for our flavorful chicken.
- 2 whole green onions: For a fresh, oniony garnish that adds a pop of color.
The Best Chicken for Sesame Chicken
For the best sesame chicken, use boneless, skinless chicken thighs—they stay moist and tender even if slightly overcooked, thanks to higher fat content, delivering juicy flavor for quick pan-frying. Breasts work but dry out easily, so watch them closely.
Would you like to add a “Thigh Prep” tip here? You could mention cutting thighs into bite-sized pieces and patting them dry before seasoning for maximum crispy coating adhesion.
If you love quick comfort food, my 30-minute one-pot beefaroni is another family favorite.
How to Make This Amazing Sesame Chicken Recipe (Step-by-Step)
Alright, let’s get cooking! This simple sesame chicken recipe comes together so beautifully, and I’m here to guide you every step of the way. Don’t worry, it’s easier than you think!
Step 1: Crafting the Irresistible Sauce
First, we whisk together all those wonderful sauce ingredients in a small bowl: soy sauce, water, toasted sesame oil, brown sugar, rice vinegar, grated fresh ginger, minced garlic, the ½ tablespoon of cornstarch, and sesame seeds. Give it a good stir until the brown sugar dissolves and the cornstarch is fully incorporated. Imagine that amazing aroma already! Set this bowl of deliciousness aside.
Step 2: Preparing the Chicken for Crispy Perfection
Now, let’s get our chicken ready for its crispy transformation! In a large bowl, we’ll whisk together the egg with the remaining 2 tablespoons of cornstarch, plus a pinch of salt and pepper. Trim any excess fat from your chicken thighs, and then cut them into bite-sized, 1-inch pieces. Toss these chicken pieces into the egg and cornstarch mixture, giving them a good coating. Think of it as a cozy bath for the chicken, getting it ready for its golden-brown adventure!
Step 3: Achieving Golden-Brown Crispy Chicken
Heat about 2 tablespoons of cooking oil in a large skillet over medium-high heat. You want the skillet to be nice and hot – swirl it around to ensure the oil coats the entire surface. Carefully add the coated chicken pieces, spreading them out in a single layer. Resist the urge to stir them right away! Let them cook undisturbed for a few minutes until the bottoms are beautifully golden brown. Then, carefully flip the chicken pieces, gently breaking them up into smaller clumps as you go. Continue cooking until the chicken is golden brown on all sides. The goal here is to get that lovely crispiness without too much fuss.
Step 4: The Grand Finale: Coating and Thickening
Once your chicken is perfectly cooked through and golden on all sides, it’s time for the sauce! Pour that prepared sauce right over the chicken in the skillet. Toss everything gently to coat each piece. As the sauce heats up and begins to simmer, you’ll notice it start to thicken beautifully. Keep gently stirring the chicken and sauce mixture until the sauce has reached a lovely glossy, thickened consistency. Then, turn off the heat. This little transformation is so satisfying!
Step 5: Serving Up Happiness
And there you have it – your gorgeous sesame chicken recipe is ready! Serve this delicious chicken generously over a bed of fluffy cooked jasmine rice. Finally, sprinkle the sliced green onions over the top for a fresh finish. It’s a simple yet incredibly satisfying meal that’s perfect for any night of the week.
Elevating Your Sesame Chicken: Cooking Methods & Tips
While our main recipe focuses on a wonderful skillet method, I love giving you options! Let’s talk about how to get that perfect crispiness and ensure your sauce is just right every time.
Achieving Ultimate Crispiness
Crispy chicken is the hallmark of a great sesame chicken recipe, and we can achieve it in a few ways!
- Pan-Frying Mastery: As detailed in the instructions, the key here is a hot skillet with enough oil, and not overcrowding the pan. Cook the chicken in batches if necessary to ensure each piece gets direct contact with the hot surface for maximum crisping. Letting the chicken cook undisturbed for the first few minutes is crucial for developing that golden crust.
- The Air Fryer Advantage: For an even healthier, wonderfully crisp result, try your air fryer! Preheat your air fryer to 400°F (200°C). Arrange the coated chicken pieces in a single layer in the air fryer basket, working in batches if needed. Air fry for 10-12 minutes, flipping halfway through, until golden brown and crispy.
- Oven-Baked Bliss: You can also bake your chicken! Preheat your oven to 400°F (200°C) and line a baking sheet with parchment paper. Arrange the coated chicken pieces in a single layer. Bake for 18-22 minutes, flipping halfway, until golden brown and cooked through. While baking might not yield the exact same crisp as pan-frying, it’s a great hands-off method.
Sauce Perfection: Balancing Flavors and Consistency
Achieving that perfect sauce consistency and flavor balance is key to a fantastic sesame chicken recipe.
| Adjustment | To Make it Sweeter | To Make it Tangier | To Make it Spicier |
|---|---|---|---|
| Ingredient | Add more brown sugar | Add more rice vinegar | Add red pepper flakes |
| Amount (approx.) | 1 tsp | 1 tsp | ¼ tsp |
If your sauce is too thick, simply whisk in a tablespoon of water or chicken broth at a time until it reaches your desired consistency. If it’s too thin after simmering, mix another ½ teaspoon of cornstarch with a tablespoon of cold water to make a slurry, then whisk it into the simmering sauce and cook for another minute until thickened.

Troubleshooting Common Sesame Chicken Woes
Don’t you worry if things aren’t absolutely perfect the first time – cooking is all about learning and adjusting!
- Soggy Chicken Savior: The most common culprits for soggy chicken are overcrowding the pan (which steams the chicken instead of frying it) or not starting with dry enough chicken pieces before coating. Ensure your chicken is patted dry before the egg wash, and cook in batches if your skillet isn’t large enough.
- Sauce Consistency Control: As mentioned above, thickness can be adjusted! Too thick? Add a splash of liquid. Too thin? A cornstarch slurry is your best friend.
- The “Why” Behind the Coating: That egg and cornstarch mixture is pure magic! The egg acts like glue, helping the cornstarch adhere to the chicken. When it hits the hot oil, the cornstarch creates a light, crispy coating that not only tastes delicious but also acts as a barrier, helping to keep the chicken juicy when you toss it with the sauce.
Delicious Ways to Serve Your Sesame Chicken
Our sesame chicken recipe is wonderfully versatile. While the fluffy jasmine rice and a sprinkle of green onions are classic for a reason, here are a few more ideas to make your meal sing!
| Serving Suggestion | Why it Pairs Well |
|---|---|
| Fluffy Jasmine Rice | A classic canvas for soaking up that delicious sauce. |
| Steamed Broccoli or Asparagus | Adds a fresh, vibrant crunch to balance the richness. |
| Quick Noodle Stir-fry | A heartier meal with even more delicious textures. |
| Quinoa or Brown Rice | For a healthier twist that still holds up beautifully to the sauce. |
Meal Prep & Storage
Life gets busy, and that’s okay! Here’s how you can make this sesame chicken recipe work even better for your schedule.
- Make-Ahead Magic: You can absolutely prepare the sauce a day or two in advance and store it in an airtight container in the refrigerator. You can also cut the chicken and keep it in the fridge, ready to be coated and cooked when you are.
- Storing Leftovers: Once cooked, let the chicken and sauce cool completely. Store any leftovers in an airtight container in the refrigerator for up to 3 days.
- Reheating for Best Results: Reheating can be a bit tricky if you want to keep that crispiness. The best method is often to reheat the chicken gently in a skillet over medium heat, or in an oven or air fryer at around 350°F (175°C) for a few minutes until warmed through. Microwaving will likely make the chicken less crispy, but it’s still perfectly edible!
Frequently Asked Questions
Got questions about this delightful sesame chicken recipe? I’m here to help!
- Can I use chicken breast instead of thighs? Yes, you can! Just be extra careful not to overcook them, as they can become dry more easily. Cook them until just done.
- Is there a gluten-free option for this recipe? You can easily make this gluten-free by using tamari or a gluten-free soy sauce alternative. Ensure your cornstarch is also certified gluten-free.
- How long does the sauce last in the refrigerator? The prepared sauce can be stored in an airtight container in the fridge for up to 3 days.
- Can I make this recipe in advance? You can prepare the sauce and cut the chicken ahead of time. For the best texture, I recommend cooking the chicken just before serving.
Conclusion
And there you have it – a wonderfully simple and incredibly rewarding sesame chicken recipe that brings comfort and joy to your table! I truly believe that cooking delicious meals shouldn’t be complicated, and this dish is a perfect testament to that. It’s proof that with a few simple ingredients and a little bit of love, you can create something truly special. I hope you and your loved ones adore this recipe as much as my family does. Now, go forth and create some kitchen magic – I can’t wait to hear all about your delicious triumphs! Please share your experience in the comments below or upload a photo of your amazing creation!
YOU CAN FOLLOW US ON PINTEREST